JavaFX の標準機能だけでシンプルな 3D トイピアノをつくろう
このエントリーは、JavaFX Advent Calendar 2014, 11日目です。
昨日は @toruwest さんの「JavaFXのTreeViewでアニメーションしてみる」でした。
明日は @skrb さんの「Java Advent Calendarと一緒になにか書きます」です。
今年も残り少なくなってきていろいろと忙しくなってきました。
そんな今日この頃、何故か「猫ふんじゃた」のメロディがマイブームとなってきました。
忙しいのなら猫の手も借りたい状況なのに踏んじゃったらいけないのにね!
と言うわけで「猫ふんじゃった」を弾きたくなって JavaFX で ToyPiano アプリケーションを作ることにしました。
JavaFX のサンプルに Xylophone という 3D アプリケーションがあります。
それを参考に JavaFX 8 の標準機能だけを使って作ってみます。
今回作るのはトイピアノなので和音にも対応させるためにタッチインタフェースを利用します。
よって動作可能なのはタッチパネル対応の OS 限定となってしまいます。
もちろん、タッチパネルは必須です。(^^;
せっかく 3D アプリケーションにするのだから鍵盤もそれなりに動かしてみます。
全てを書こうとすると凄く長くなってしまいますので JavaFX 3D API だけを取り上げます。
タッチインタフェースやアニメーションタイマーの使用については割愛させていただきます。
と言っても他の部分は特に難しいことはしてないので!
完成版は次の動画のようになります。
それでは、さらっと JavaFX 3D API について調べてみましょう。
2D と 3D の違いは何か?
おおざっぱに言うと 2D の座標に Z 軸が追加され、ライトやカメラを意識しなければならなくなった。
その代わりに表現力が豊になった。
本当におおざっぱですがそんなもんです。
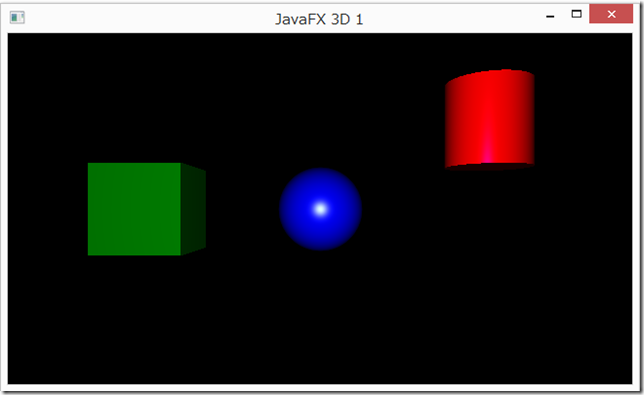
では、JavaFX ではじめから用意されている 3D オブジェクト(Primitive Shapes)を表示させるシンプルなプログラムを見てみましょう。
|
1 2 3 4 5 6 7 8 9 10 11 12 13 14 15 16 17 18 19 20 21 22 23 24 25 26 27 28 29 30 31 32 33 34 35 36 37 38 39 40 41 42 43 44 45 46 47 48 49 50 51 52 53 54 55 56 57 58 59 60 61 62 63 64 65 66 |
package jp.yucchi.javafx3d_1; import javafx.application.Application; import javafx.scene.Group; import javafx.scene.PerspectiveCamera; import javafx.scene.Scene; import javafx.scene.paint.Color; import javafx.scene.shape.Box; import javafx.scene.shape.Cylinder; import javafx.scene.shape.Sphere; import javafx.stage.Stage; /** * * @author Yucchi */ public class JavaFX3D_1 extends Application { @Override public void start(Stage primaryStage) { final Group root = new Group(); final Box box = new Box(100.0d, 100.0d, 100.0d); final Cylinder cylinder = new Cylinder(50.0d, 100.0d); final Sphere sphere = new Sphere(50.0d); // box を左へ (-200) 移動 (X 軸) box.setTranslateX(-200.0d); // cylinder を右へ (200) 移動 (X 軸) そして上へ (-100) 移動 (Y 軸) cylinder.setTranslateX(200.0d); cylinder.setTranslateY(-100.0d); // 透視投影カメラ final PerspectiveCamera cam = new PerspectiveCamera(true); // Field of View cam.setFieldOfView(45.5d); // Clipping Planes cam.setNearClip(1.0d); cam.setFarClip(1_000_000.0d); // カメラを 500 後退させる。(Z 軸を -500) cam.setTranslateZ(-500.0d); root.getChildren().addAll(box, cylinder, sphere); Scene scene = new Scene(root, 640.0d, 360.0d, Color.BLACK); scene.setCamera(cam); primaryStage.setTitle("JavaFX 3D 1"); primaryStage.setScene(scene); primaryStage.show(); } /** * @param args the command line arguments */ public static void main(String[] args) { launch(args); } } |
JavaFX では三つの 3D オブジェクトがはじめから javafx.scene.shape パッケージに定義されています。
Box
Cylinder
Sphere
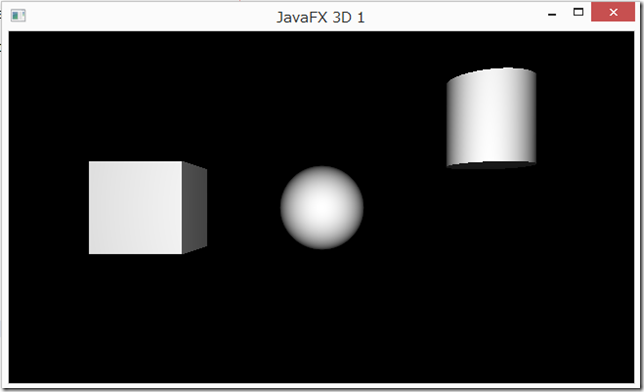
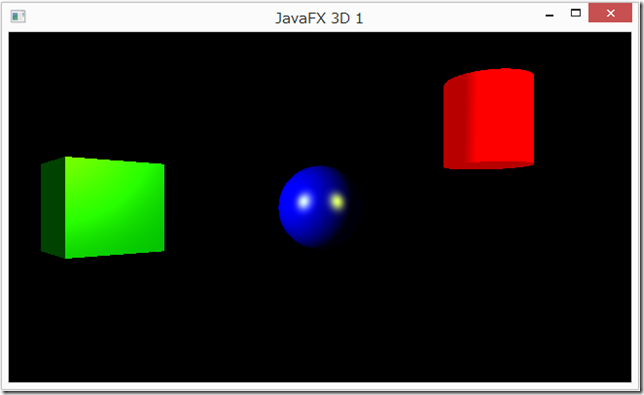
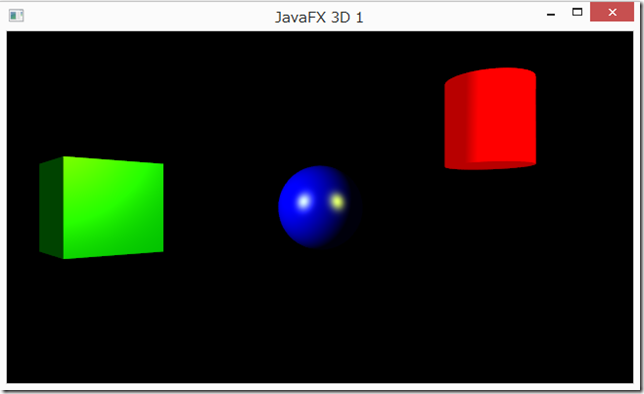
上記のプログラムはそれらを下図のように表示させています。
これら以外は自分で TriangleMesh / MeshView を駆使して 3D オブジェクトを作り上げるか、モデルインポーターを使用するかしなければならないでしょう。
さて、このプログラムはどのように理解すればいいのでしょうか?
順番にみていきましょう。
final Box box = new Box(100.0d, 100.0d, 100.0d);
これは、辺の長さが横、縦、奥行きそれぞれ 100 の長さの立方体のオブジェクトを作っています。
final Cylinder cylinder = new Cylinder(50.0d, 100.0d);
こちらは、半径 50、高さ 100 のシリンダーオブジェクトを作ってます。
final Sphere sphere = new Sphere(50.0d);
最後に半径 50 の球体オブジェクトを作ってます。
はじめから定義されているのでお手軽に作れます。
これら 3D オブジェクトはこのままでは全て座標原点を中心に配置され重なってしまいます。
なので次のように移動させています。
// box を左へ (-200) 移動 (X 軸)
box.setTranslateX(-200.0d);
// cylinder を右へ (200) 移動 (X 軸) そして上へ (-100) 移動 (Y 軸)
cylinder.setTranslateX(200.0d);
cylinder.setTranslateY(-100.0d);
javafx.scene.Node クラスの setTranslateX(double value), setTranslateY(double value), setTranslateZ(double value) と言う便利な移動メソッドがあります。
それぞれ X 軸、Y 軸、Z 軸方向へ移動できます。
ここで注意が必要なのは Y 軸 です。
最初にも説明したように JavaFX の 3D 座標は 2D のものに Z 軸が加えられたものなので上方向に移動させる場合は、
setTranslateY(double value) の引数の値は負の値になります。
次はカメラについて見てみます。
カメラには PerspectiveCamera (透視投影カメラ) と ParallelCamera (直投影カメラ) の二種類があります。
今回は PerspectiveCamera を使用します。
// 透視投影カメラ
final PerspectiveCamera cam = new PerspectiveCamera(true);
// Field of View
cam.setFieldOfView(45.5d);
// Clipping Planes
cam.setNearClip(1.0d);
cam.setFarClip(1_000_000.0d);
PerspectiveCamera cam = new PerspectiveCamera(true); の引数は fixedEyeAtZeroプロパティで true に設定することによって
カメラの位置が原点に配置されます。
ちなみにこの場合の原点の位置は画面のど真ん中です。
これを true に設定することによって容易にカメラを動かすことが可能となります。
カメラを原点位置に生成することは上記のように簡単にできます。
次にカメラの写り具合を設定します。
視野角の設定は以下のようにします。
cam.setFieldOfView(45.5d);
引数の値、視野角 45.5 度で設定しました。何処かで OpenGL の記事か何かでこれくらいが良いと見たような記憶があるので(^^;
次にカメラからどれくらいの距離を写すのか設定します。
カメラからこれだけ離れていれば写すよってのが
cam.setNearClip(1.0d);
で、引数の値 1.0 で設定されてます。これ以上近い物は写りません。
カメラからどれだけ離れているところまで写すかは
cam.setFarClip(1_000_000.0d);
引数の値、1_000_000 まで写ります。
これ以上遠くは写りません。
これら設定はケースバイケースかお好みで!
カメラを配置、設定したのはいいけどこれでは原点配置なので sphere のど真ん中なので残念な状態です。
そこでカメラを移動させてみます。
Z 軸手前方向にカメラを移動させます。
// カメラを 500 後退させる。(Z 軸を -500)
cam.setTranslateZ(-500.0d);
これで原点から 500 Z 軸方向に後退した位置にカメラを配置できました。
あとはこのカメラを Scene にセットすればいいだけです。
scene.setCamera(cam);
このプログラムの実行結果から原点配置の状態でカメラのレンズは Z 軸、正の方向に向いていることが確認できました。
これで Primitive Shapes の生成と移動、PerspectiveCamera の生成と設定、移動、撮影ができるようになりました。
ここで ParallelCamera (直投影カメラ) を使うとどうなるか試してみましょう。
先ほどのカメラの定義とカメラの移動を次のように変更します。
// 直投影カメラ
final ParallelCamera cam = new ParallelCamera();
// Field of View ありません!
// cam.setFieldOfView(45.5d);
// Clipping Planes
cam.setNearClip(1.0d);
cam.setFarClip(1_000_000.0d);
ParallelCamera (直投影カメラ)のコンストラクタに fixedEyeAtZeroプロパティを設定する引数はありません。
Field of View も設定できません。
直投影カメラの性質上必要ないのでしょう。
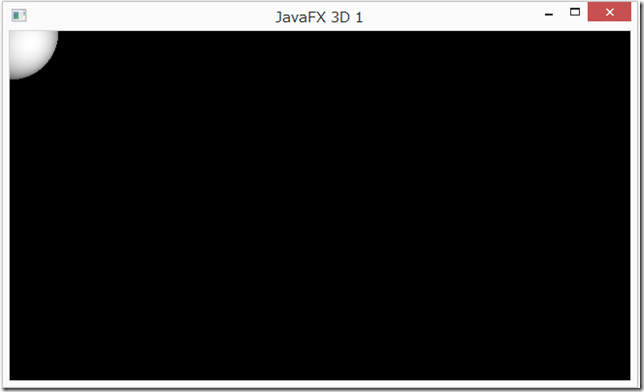
では、ParallelCamera (直投影カメラ)を使った場合プログラムの実行結果がどうなるのか確認してみます。
Primitive Shapes の Sphere の中心が左上の角の部分( 2D の原点)となるように表示されています。
Sphere と ParallelCamera の位置情報を下記コードを書き加えて調べてみます。
System.out.println(“Sphere の位置情報 ” + sphere.getBoundsInParent());
System.out.println(“ParallelCameraの位置情報 ” + cam.getBoundsInParent());
実行結果で得られた値は次のようになります。
Sphere の位置情報 BoundingBox [minX:-50.0, minY:-50.0, minZ:-50.0, width:100.0, height:100.0, depth:100.0, maxX:50.0, maxY:50.0, maxZ:50.0]
ParallelCameraの位置情報 BoundingBox [minX:0.0, minY:0.0, minZ:0.0, width:0.0, height:0.0, depth:0.0, maxX:0.0, maxY:0.0, maxZ:0.0]
3D オブジェクトとカメラの座標の原点は同一ではないことが解ります。
デフォルトの 2D カメラってことですね。
Sphere と Cylinder と Box を移動させてみます。
sphere.setTranslateX(scene.widthProperty().divide(2).doubleValue());
sphere.setTranslateY(scene.getHeight() / 2.0d);
cylinder.setTranslateX(scene.widthProperty().divide(2).doubleValue() + 200.0d);
cylinder.setTranslateY(scene.getHeight() / 2.0d);
box.setTranslateX(scene.widthProperty().divide(2).doubleValue() – 200.0d);
box.setTranslateY(scene.getHeight() / 2.0d – 100.0d);
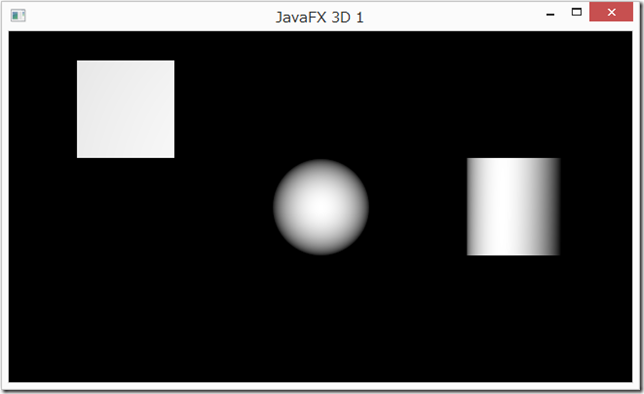
プログラムの実行結果は下図のようになります。
Sphere の位置情報 BoundingBox [minX:270.0, minY:130.0, minZ:-50.0, width:100.0, height:100.0, depth:100.0, maxX:370.0, maxY:230.0, maxZ:50.0]
ParallelCameraの位置情報 BoundingBox [minX:0.0, minY:0.0, minZ:0.0, width:0.0, height:0.0, depth:0.0, maxX:0.0, maxY:0.0, maxZ:0.0]
PerspectiveCamera (透視投影カメラ)とは違いすべてのオブジェクトが並行に表示されてます。
距離感というか奥行きが全然解らないですね。
ParallelCamera (直投影カメラ)も試したことだし次へ進みましょう。
3D オブジェクト(Primitive Shapes)を表示させることはできるようになったけど、
でも白黒なんていつの時代だ?っていうのはちょっとね・・・
とりあえず cylinder に色をつけてみましょう。
先ほどのプログラムで Primitive Shapes を生成したあとに下記コードを追加します。
// フォンシェーディングを設定
final PhongMaterial cylinderMaterial = new PhongMaterial();
// 拡散光による色の設定
cylinderMaterial.setDiffuseColor(Color.RED);
// スペキュラカラー(反射光の色)の設定
cylinderMaterial.setSpecularColor(Color.MAGENTA);
// マテリアルを設定
cylinder.setMaterial(cylinderMaterial);
// ドローモードを設定
cylinder.setDrawMode(DrawMode.FILL);
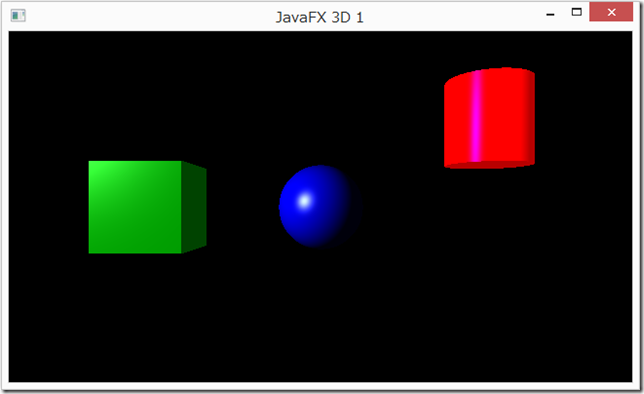
上記コードのコメントにあるように、フォンマテリアルオブジェクトを生成し、拡散光による色の設定、反射光による色の設定をします。
そしてそのマテリアルを cylinder オブジェクトに設定しています。
ドローモードも LINE とか設定できますが FILL を設定しています。
LINE はワイヤーモデルの状態です。
上記のようにマテリアルの設定は javafx.scene.paint.PhongMaterial クラスの setチョメチョメ() メソッドで設定します。
チョメチョメは何を設定するか解るように記述されています。(ごめんなさい。変な表現で)
ドローモードの設定は javafx.scene.shape.Shape3D クラスの setDrawMode(DrawMode value) です。
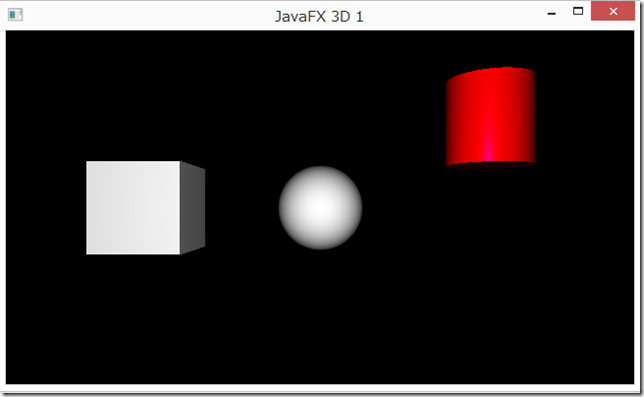
プログラムの実行結果は下図のようになります。
ちょっとこのままでは色のついてない残り二つが寂しのでそれらにも色をつけてみました。
ここで Sphere だけスペキュラパワーを設定してみました。
デフォルト値は 32.0d なので半分の 16.0d で設定しました。
// フォンシェーディングを設定
final PhongMaterial boxMaterial = new PhongMaterial();
// 拡散光による色の設定
boxMaterial.setDiffuseColor(Color.GREEN);
// スペキュラカラー(反射光の色)の設定
boxMaterial.setSpecularColor(Color.LIGHTGREEN);
// マテリアルを設定
box.setMaterial(boxMaterial);
// ドローモードを設定
box.setDrawMode(DrawMode.FILL);
// フォンシェーディングを設定
final PhongMaterial sphereMaterial = new PhongMaterial();
// 拡散光による色の設定
sphereMaterial.setDiffuseColor(Color.BLUE);
// スペキュラカラー(反射光の色)の設定
sphereMaterial.setSpecularColor(Color.LIGHTCYAN);
// スペキュラパワーを設定
sphereMaterial.setSpecularPower(16.0d);
// マテリアルを設定
sphere.setMaterial(sphereMaterial);
// ドローモードを設定
sphere.setDrawMode(DrawMode.FILL);
このプログラムの実行結果は下図のようになります。
3D オブジェクトに色も付けることができたし次はライトを設定してみましょう。
ライトはアンビエントライトとポイントライトの二種類が用意されています。
アンビエントライトは環境光( 光源からの光が直接当たっていない部分を照らす光、物理的には光を受けている面からの散乱光である )のことです。
ポイントライトは点光源です。点光源を置いた位置から全方向に光りが伸びていきます。
その光りは距離が離れるにしたがって弱くなっていきます。
それでは先ほどのプログラムにこれら二つのライトを配置してみましょう。
// アンビエントライト
AmbientLight ambient = new AmbientLight();
ambient.setColor(Color.rgb(184, 134, 11, 0.5));
// ポイントライト
PointLight point = new PointLight();
point.setColor(Color.GHOSTWHITE);
// ポイントライトを移動
point.setTranslateX(-800.0d);
point.setTranslateY(-300.0d);
point.setTranslateZ(-800.0d);
root.getChildren().addAll(box, cylinder, sphere, ambient, point);
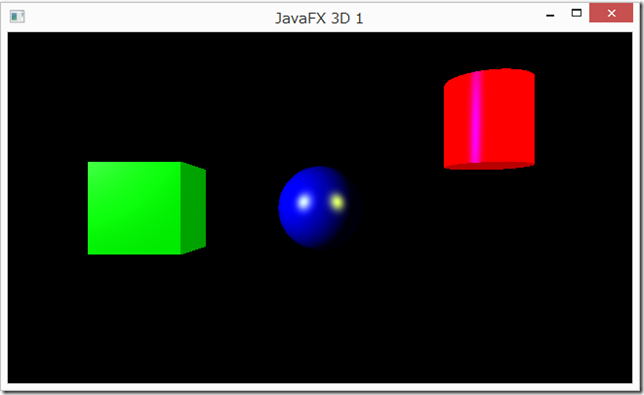
アンビエントライトとポイントライトを上記コードのように javafx.scene.LightBase クラスの設定メソッドを使い設定します。
それぞれの色を設定しているだけで特に難しいことはしなくていいようです。
ただポイントライトの配置が原点になってしまうのでポイントライトを移動させています。
移動させないと Sphere の中心位置に配置されるので Sphere が表示されなくなります。
これら二つのライトを配置したプログラムの実行結果は下図のようになります。
さて、ライトって一つだけしか配置できないのでしょうか?
ちょっと試してみましょう。
// ポイントライト 2
PointLight point_2 = new PointLight();
point_2.setColor(Color.YELLOW);
// ポイントライト 2 を移動
point_2.setTranslateX(800.0d);
point_2.setTranslateY(-300.0d);
point_2.setTranslateZ(-800.0d);
root.getChildren().addAll(box, cylinder, sphere, ambient, point, point_2);
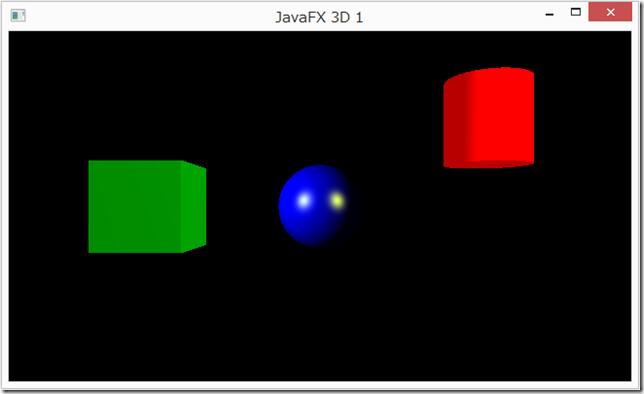
プログラムの実行結果は下図のようになりました。
複数のライトが配置できるようです。
でも、特定の 3D オブジェクトにだけライトを当てるにはどうすればいいのでしょうか?
これも簡単に設定できます。
それでは先ほど追加したポイントライト 2 を Sphere だけに当てるようにしてみます。
下記コードのようにスコープを設定するだけです。
point.getScope().add(sphere);
それでは確認のためにプログラムを実行してみます。
期待通りに Sphere だけポイントライト 2 が当たっています。
ライトを駆使すれば綺麗な絵を得ることができますね!
次は 3D オブジェクトを回転させてみましょう。
左に表示されている Box を左奥の辺を中心位置として水平に45度右回転させます。
次のコードを先ほどのプログラムに書き加えてください。
// Box を水平45度右回転させる。回転の中心( ピボット )は左奥の辺とする
box.getTransforms().setAll(new Rotate(45.0d, -50.0d, 0.0d, 50.0d, Rotate.Y_AXIS));
実行結果は下図のようになります。
javafx.scene.transform.Rotate インスタンス生成時に第一引数 回転角、第二引数、第三引数、第四引数はピボットの位置を X, Y ,Z 軸として設定します。
第五引数は回転軸を設定します。
それらを javafx.scene.Node クラスの getTransforms() で Box のトランスフォームオブジェクトを取得し setAll() メソッドで設定しています。
今回は setAll() メソッドを使いましたが次のような方法もあります。
box.getTransforms().addAll(new Rotate(45.0d, -50.0d, 0.0d, 50.0d, Rotate.Y_AXIS));
これは今回目標とする ToyPiano アプリケーションで使うと問題が出るので前述の setAll() メソッド を使用します。
その問題は何かと言うとタッチプレスされたら鍵盤をある角度だけピボットを設定されたところから回転させ、
タッチリリースされたら動かした分だけ戻すという処理を add() メソッドを使って実装すると想定していた角度より大きく( 2倍 )動いてしまうことがあります。
何気に動かして動かした分戻したらいいやってのは駄目なこともあるんです。
このようなことを避けるため setAll() メソッドを使います。
これで 3D オブジェクトの移動、回転、そしてカメラとライトの設定ができるようになりました。
さて、これまでの実行結果を見て気が付いた方もいらっしゃると思うのですが 3D オブジェクトにアンチエイリアスが効いてないようです。
デフォルトではアンチエイリアスは無効となっているようなのでこれを有効にしてみましょう。
プログラムの Scene を生成するコードを次のように変更します。
Scene scene = new Scene(root, 640.0d, 360.0d, true, SceneAntialiasing.BALANCED);
scene.setFill(Color.BLACK);
何故かアンチエイリアスの設定をとる引数を使うと背景色の設定ができなくなります。
そのため別に背景色を設定するコードを付け加えました。
実行結果は下図のようになり今までとは違いエッジが滑らかに表示されます。
次に 3D オブジェクトの拡大やテクスチャの貼り付けなども説明したいところですが今回の ToyPiano アプリケーションでは使用していないので割愛させていただきます。
と言いつつ・・・簡単にどのようにするのか紹介します。
興味の無い方はこの部分は読み飛ばしてくださいませ。
ではよく見かけるサンプルを JavaFX で試してみましょう。
|
1 2 3 4 5 6 7 8 9 10 11 12 13 14 15 16 17 18 19 20 21 22 23 24 25 26 27 28 29 30 31 32 33 34 35 36 37 38 39 40 41 42 43 44 45 46 47 48 49 50 51 52 53 54 55 56 57 58 59 60 61 62 63 64 65 66 67 68 69 70 71 72 73 74 75 76 77 78 79 80 81 82 83 84 85 86 87 88 89 90 91 92 93 94 95 96 97 98 99 100 101 102 103 104 105 106 107 108 109 110 111 112 |
package jp.yucchi.javafx3d_earth; import javafx.application.Application; import javafx.scene.AmbientLight; import javafx.scene.Group; import javafx.scene.PerspectiveCamera; import javafx.scene.PointLight; import javafx.scene.Scene; import javafx.scene.SceneAntialiasing; import javafx.scene.image.Image; import javafx.scene.paint.Color; import javafx.scene.paint.PhongMaterial; import javafx.scene.shape.DrawMode; import javafx.scene.shape.Sphere; import javafx.stage.Stage; /** * * @author Yucchi */ public class JavaFX3D_Earth extends Application { @Override public void start(Stage primaryStage) { final Group root = new Group(); final Sphere sphere = new Sphere(500.0d); // フォンシェーディングを設定 final PhongMaterial sphereMaterial = new PhongMaterial(); // DiffuseMap sphereMaterial.setDiffuseMap( new Image(this.getClass().getResource("resources/earth_texture.jpg").toExternalForm(), 8_192 / 2.0d, 4_092 / 2.0d, true, true ) ); // BumpMap sphereMaterial.setBumpMap( new Image(this.getClass().getResource("resources/earth_normalmap.jpg").toExternalForm(), 8_192 / 2.0d, 4_092 / 2.0d, true, true ) ); // SpecularMap sphereMaterial.setSpecularMap( new Image(this.getClass().getResource("resources/earth_specularmap.jpg").toExternalForm(), 8_192 / 2.0d, 4_092 / 2.0d, true, true ) ); // マテリアルを設定 sphere.setMaterial(sphereMaterial); // ドローモードを設定 sphere.setDrawMode(DrawMode.FILL); // 透視投影カメラ final PerspectiveCamera cam = new PerspectiveCamera(true); // Field of View cam.setFieldOfView(45.5d); // Clipping Planes cam.setNearClip(1.0d); cam.setFarClip(1_000_000.0d); // カメラを 1500 後退させる。(Z 軸を -1500) cam.setTranslateZ(-1_500.0d); // アンビエントライト AmbientLight ambient = new AmbientLight(); ambient.setColor(Color.rgb(90, 90, 90, 0.6)); // ポイントライト PointLight point = new PointLight(); point.setColor(Color.WHITE); // ポイントライトを移動 point.setTranslateX(-1_800.0d); point.setTranslateY(-1_300.0d); point.setTranslateZ(-1_800.0d); root.getChildren().addAll(sphere, ambient, point); Scene scene = new Scene(root, 1_024, 768, true, SceneAntialiasing.BALANCED); scene.setFill(Color.BLACK); scene.setCamera(cam); primaryStage.setTitle("JavaFX 3D EARTH"); primaryStage.setScene(scene); primaryStage.show(); } /** * @param args the command line arguments */ public static void main(String[] args) { launch(args); } } |
テクスチャを貼るには javafx.scene.paint.PhongMaterial クラスを使用します。
PhongMaterial インスタンスを生成するときにコンストラクタの引数として渡すか、
各種イメージを javafx.scene.paint.PhongMaterial クラスの設定メソッド
setDiffuseMap(Image value)
setBumpMap(Image value)
setSpecularMap(Image value)
setSelfIlluminationMap(Image value)
を使って設定するだけです。
非常にお手軽に設定できます。
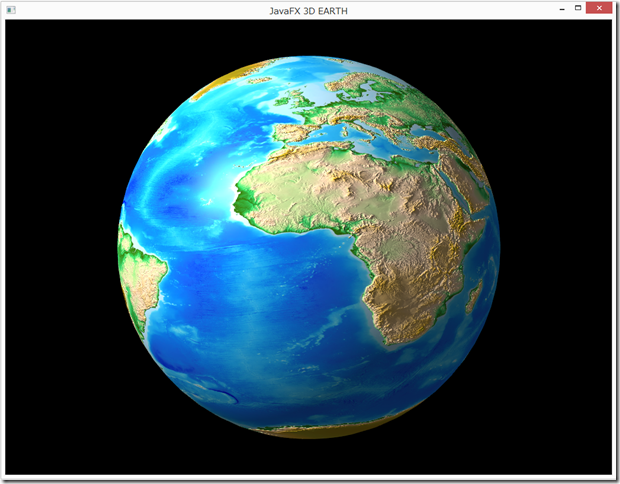
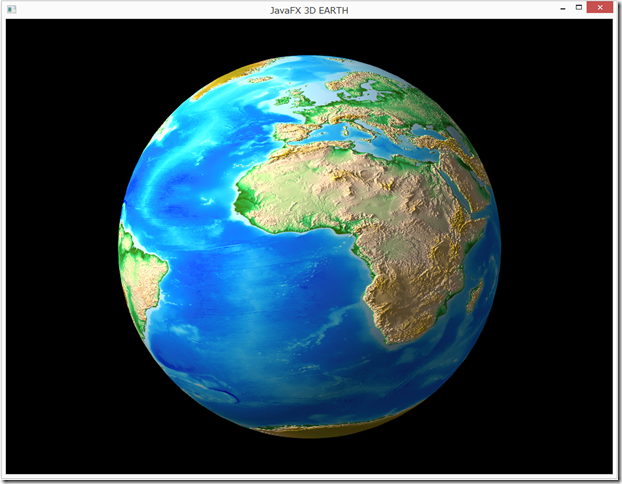
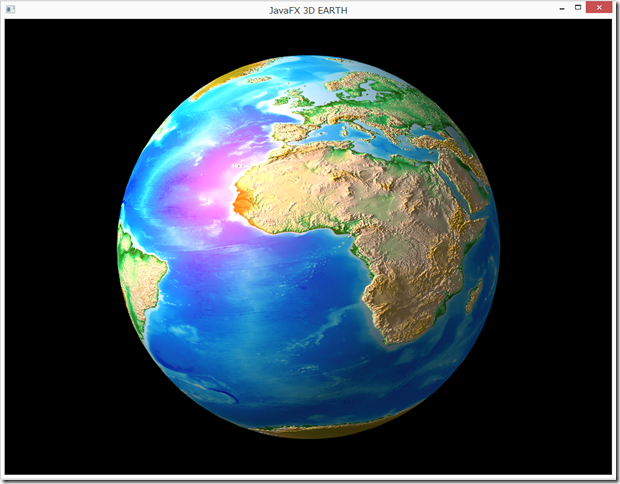
このプログラムの実行結果は下図のようになります。
それぞれがどのように作用しているのか少しみておきましょう。
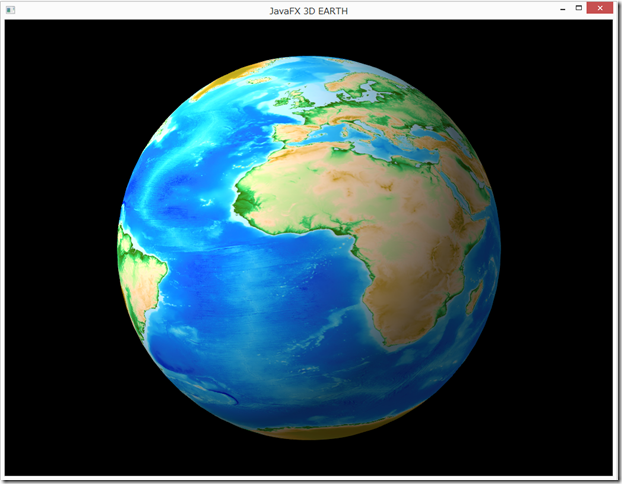
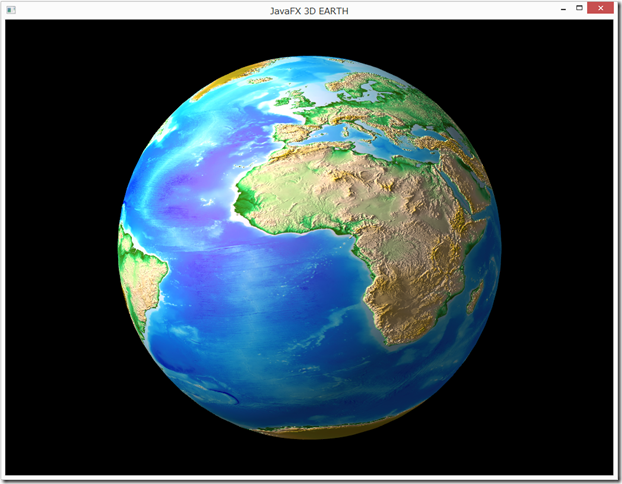
setDiffuseMap(Image value) だけを設定した場合プログラムの実行結果は下図のようになり、
でこぼこ感がまったくなくのっぺりしたようになります。
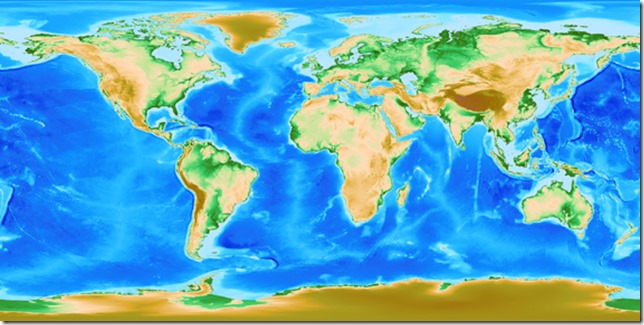
使ったイメージファイルはこれです。(サイズは違います)
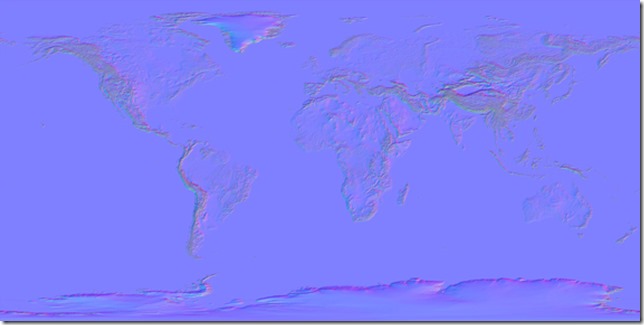
setBumpMap(Image value) を設定することによりでこぼこ感を演出することができます。
イメージファイルはこれを使用します。
プログラムの実行結果は下図のようになります。
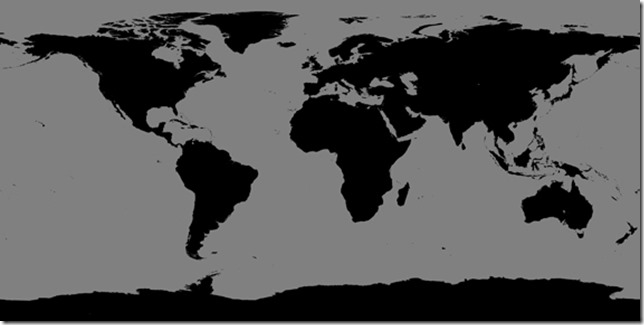
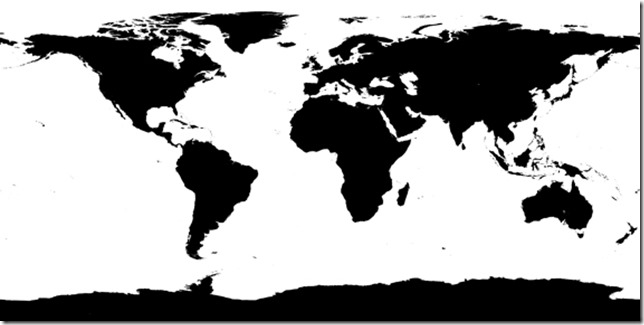
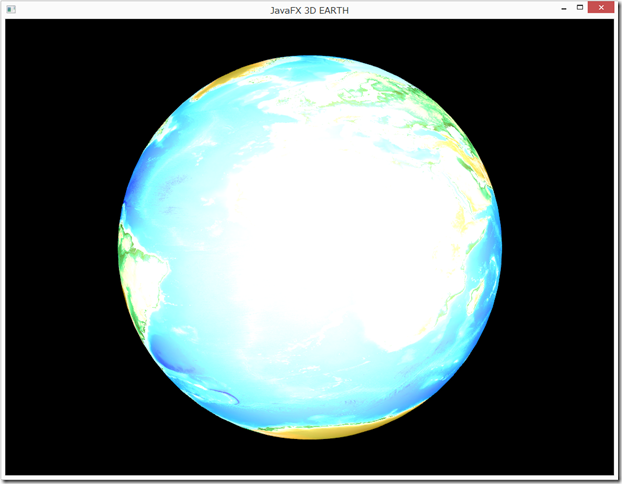
setSpecularMap(Image value) は反射光を制御するもので次のようなイメージファイルを使用します。
黒くなっている所は反射光を出さないようです。
では SpecularMap が設定されていない場合はどうなるのかみてみます。
setSpecularMap(Image value) を未設定としたうえでプログラムに反射光の設定を加えます。
sphereMaterial.setSpecularColor(Color.RED);
sphereMaterial.setSpecularPower(3.0d);
このプログラムの実行結果は下図のようになります。
赤い反射光がしっかりと表示されてます。
setSpecularMap(Image value) が設定されていれば反射光を制御可能となります。
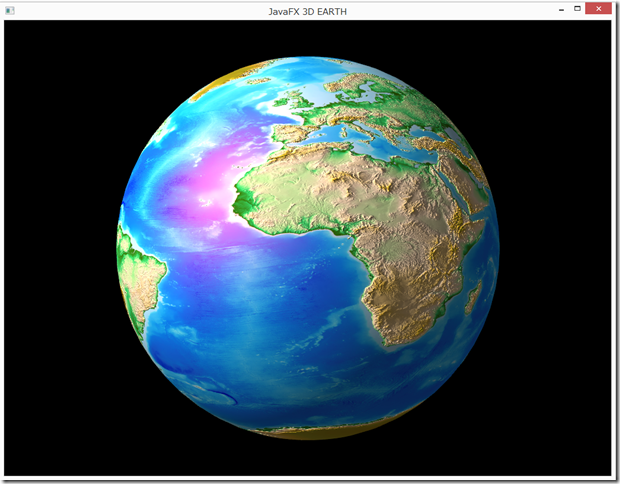
setSpecularMap(Image value) を適用して実行すると下図のように反射光が適用されている部分が限定できます。
ちょっと解りづらいけど灰色の部分だけ薄く反射されているのが確認できます。
解りやすくするために SpecularMap イメージファイルを下図のように反射ベース色を灰色から白色へと変更してみます。
これで実行すると下図のようになります。
SpecularMap を上手く活用すれば繊細な描画が可能となりそうです。
それでは DiffuseColor を設定してみます。
プログラムに次のコードを書き加えます。
sphereMaterial.setDiffuseColor(Color.ORANGERED);
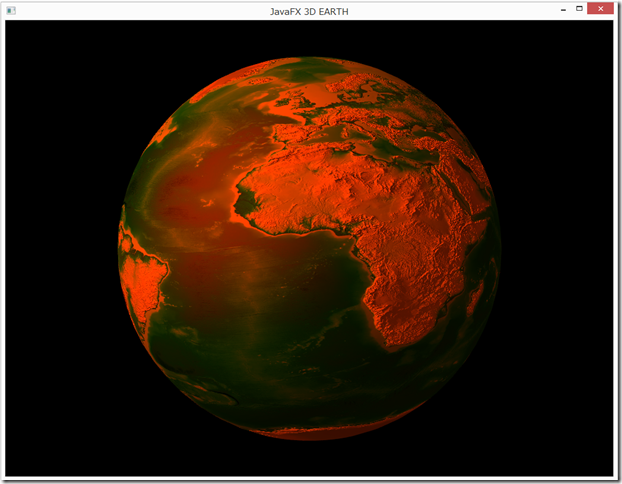
このプログラムを実行すると 設定した DiffuseColor オレンジレッドが適用され赤っぽい地球が表示されます。
面白いですね。
まるでガミラス帝国に攻撃されて放射能汚染された地球のようです。ww
最後に setSelfIlluminationMap(Image value) を試してみましょう。
これ使い道が良く解らないのですが名前からすると自発光のようです。
なのでライトを無しにして、マテリアルの設定は setSelfIlluminationMap(Image value) だけにしました。
// SelfIlluminationMap
sphereMaterial.setSelfIlluminationMap(
new Image(this.getClass().getResource(“resources/earth_texture.jpg”).toExternalForm(),
8_192 / 2.0d,
4_092 / 2.0d,
true,
true
)
);
root.getChildren().addAll(sphere);
実行結果は下図のようになりました。
やっぱり自発光の設定のようです。
発光色や強さの設定ができないかと調べてみたのですが解りませんでした。
以上テクスチャの貼り方を簡単に説明させていただきました。
ToyPiano アプリケーションではテクスチャは貼ってないので蛇足となってしまいましたがお気に入りのテクスチャを持っている方は貼ってお楽しみください。
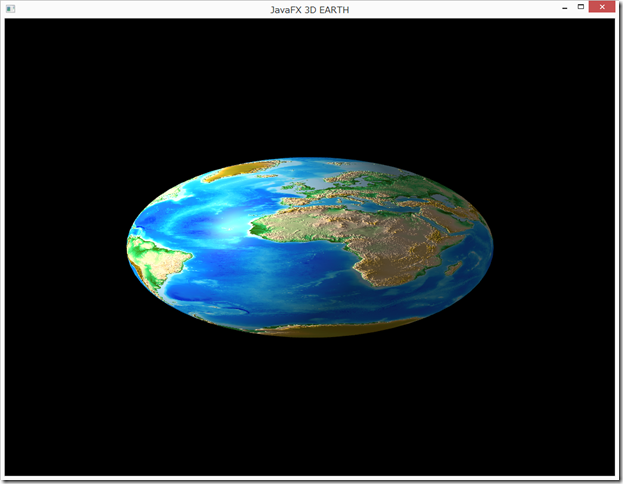
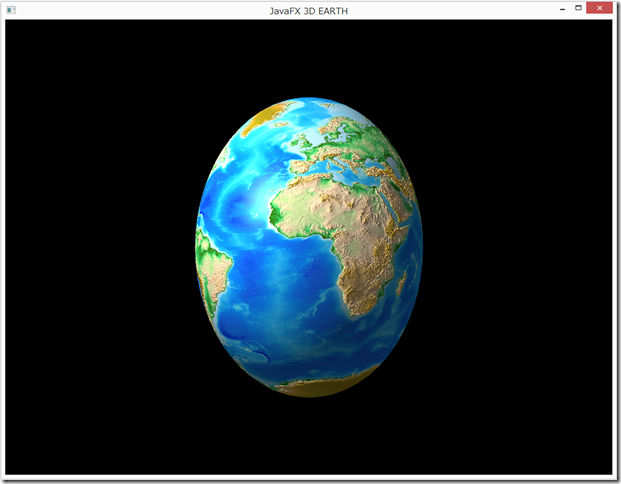
蛇足ついでに 3D オブジェクトの拡大縮小もやっておきましょう。
Sphere がマウスクリックされた座標位置を取得しそれらの値を適当に加工して拡大縮小させてみます。
プログラムに下記コードを追加します。
scene.setOnMouseClicked(event -> {
PickResult pickResult = event.getPickResult();
if (pickResult.getIntersectedNode() == sphere) {
Point3D point3d = pickResult.getIntersectedPoint();
if (point3d.getX() != 0.0d && point3d.getY() != 0.0d && point3d.getZ() != 0.0d) {
sphere.setScaleX(abs(point3d.getX() / 500.0d) * 1.2d);
sphere.setScaleY(abs(point3d.getY() / 500.0d) * 1.2d);
sphere.setScaleZ(abs(point3d.getZ() / 500.0d) * 1.2d);
} else {
sphere.setScaleX(0.5d);
sphere.setScaleY(0.5d);
sphere.setScaleZ(0.5d);
}
} else {
sphere.setScaleX(1.0d);
sphere.setScaleY(1.0d);
sphere.setScaleZ(1.0d);
}
});
プログラムの実行結果は下図のようになります。
PickResult クラスを使い Scene のクリックされたものが Sphere オブジェクトかどうか
getIntersectedNode() メソッドで判定し、そうであれば
getIntersectedPoint() メソッドで Point3D インスタンスを渡します。
Point3D クラスを使い、X, Y, Z 座標位置情報を取得してそれらの値の絶対値を Sphere の半径で割りそして 1.2 倍してます。
javafx.scene.Node クラスのメソッドを利用してそれぞれ X, Y, Z 座標値に適用してます。
setScaleX(double value)
setScaleY(double value)
setScaleZ(double value)
上記プログラムでは X, Y, Z 軸の何れかの座標位置が 0 なら拡大縮小を 0.5 倍するようにしています。
Sphere オブジェクトがクリックされてなければ拡大縮小は元に(1.0 倍)に戻します。
拡大縮小も簡単にできますね!
ついでだから回転させてみましょう。
Z 軸を 23.5 度傾けて反時計回りに回転させてみます。
プログラムに下記のようみ変更します。
|
1 2 3 4 5 6 7 8 9 10 11 12 13 14 15 16 17 18 19 20 21 22 23 24 25 26 27 28 29 30 31 32 33 34 35 36 37 38 39 40 41 42 43 44 45 46 47 48 49 50 51 52 53 54 55 56 57 58 59 60 61 62 63 64 65 66 67 68 69 70 71 72 73 74 75 76 77 78 79 80 81 82 83 84 85 86 87 88 89 90 91 92 93 94 95 96 97 98 99 100 101 102 103 104 105 106 107 108 109 110 111 112 113 114 115 116 117 118 119 120 121 122 123 124 125 126 127 128 129 130 131 132 133 134 135 136 137 138 139 140 141 142 143 144 145 146 147 148 149 150 151 152 153 154 155 156 157 158 159 160 161 162 163 164 165 166 167 168 169 170 171 172 173 174 175 176 177 178 179 180 181 182 183 184 185 186 187 188 189 190 191 192 193 194 195 196 197 198 199 200 201 |
package jp.yucchi.javafx3d_earth; import static java.lang.Math.abs; import javafx.animation.AnimationTimer; import javafx.application.Application; import javafx.beans.property.DoubleProperty; import javafx.beans.property.SimpleDoubleProperty; import javafx.geometry.Point3D; import javafx.scene.AmbientLight; import javafx.scene.Group; import javafx.scene.PerspectiveCamera; import javafx.scene.PointLight; import javafx.scene.Scene; import javafx.scene.SceneAntialiasing; import javafx.scene.image.Image; import javafx.scene.input.PickResult; import javafx.scene.paint.Color; import javafx.scene.paint.PhongMaterial; import javafx.scene.shape.DrawMode; import javafx.scene.shape.Sphere; import javafx.scene.transform.Rotate; import javafx.stage.Stage; /** * * @author Yucchi */ public class JavaFX3D_Earth extends Application { @Override public void start(Stage primaryStage) { final Group root = new Group(); final Sphere sphere = new Sphere(500.0d); // フォンシェーディングを設定 final PhongMaterial sphereMaterial = new PhongMaterial(); // DiffuseMap sphereMaterial.setDiffuseMap( new Image(this.getClass().getResource("resources/earth_texture.jpg").toExternalForm(), 8192 / 2d, 4092 / 2d, true, true ) ); // BumpMap sphereMaterial.setBumpMap( new Image(this.getClass().getResource("resources/earth_normalmap.jpg").toExternalForm(), 8192 / 2d, 4092 / 2d, true, true ) ); // SpecularMap sphereMaterial.setSpecularMap( new Image(this.getClass().getResource("resources/earth_specularmap.jpg").toExternalForm(), 8192 / 2d, 4092 / 2d, true, true ) ); // // SelfIlluminationMap // sphereMaterial.setSelfIlluminationMap( // new Image(this.getClass().getResource("resources/earth_texture.jpg").toExternalForm(), // 8192 / 2d, // 4092 / 2d, // true, // true // ) // ); sphereMaterial.setSpecularColor(Color.WHITE); sphereMaterial.setSpecularPower(2.5d); // sphereMaterial.setDiffuseColor(Color.ORANGERED); // マテリアルを設定 sphere.setMaterial(sphereMaterial); // ドローモードを設定 sphere.setDrawMode(DrawMode.FILL); // 透視投影カメラ final PerspectiveCamera cam = new PerspectiveCamera(true); // Field of View cam.setFieldOfView(45.5d); // Clipping Planes cam.setNearClip(1.0d); cam.setFarClip(1_000_000.0d); // カメラを 1500 後退させる。(Z 軸を -1500) cam.setTranslateZ(-1_500.0d); // アンビエントライト AmbientLight ambient = new AmbientLight(); ambient.setColor(Color.rgb(90, 90, 90, 0.6)); // ポイントライト PointLight point = new PointLight(); point.setColor(Color.WHITE); // ポイントライトを移動 point.setTranslateX(-1_800.0d); point.setTranslateY(-1_300.0d); point.setTranslateZ(-1_800.0d); root.getChildren().addAll(sphere, ambient, point); Scene scene = new Scene(root, 1_024, 768, true, SceneAntialiasing.BALANCED); scene.setFill(Color.BLACK); scene.setCamera(cam); scene.setOnMouseClicked(event -> { PickResult pickResult = event.getPickResult(); if (pickResult.getIntersectedNode() == sphere) { Point3D point3d = pickResult.getIntersectedPoint(); if (point3d.getX() != 0.0d && point3d.getY() != 0.0d && point3d.getZ() != 0.0d) { sphere.setScaleX(abs(point3d.getX() / 500.0d) * 1.2d); sphere.setScaleY(abs(point3d.getY() / 500.0d) * 1.2d); sphere.setScaleZ(abs(point3d.getZ() / 500.0d) * 1.2d); } else { sphere.setScaleX(0.5d); sphere.setScaleY(0.5d); sphere.setScaleZ(0.5d); } } else { sphere.setScaleX(1.0d); sphere.setScaleY(1.0d); sphere.setScaleZ(1.0d); } }); // この部分不要だけどよくある間違いの説明のため final DoubleProperty angleX = new SimpleDoubleProperty(0.0d); final DoubleProperty angleY = new SimpleDoubleProperty(0.0d); final DoubleProperty angleZ = new SimpleDoubleProperty(0.0d); Rotate xRotate; Rotate yRotate; Rotate zRotate; sphere.getTransforms().setAll( xRotate = new Rotate(0.0d, Rotate.X_AXIS), yRotate = new Rotate(0.0d, Rotate.Y_AXIS), zRotate = new Rotate(0.0d, Rotate.Z_AXIS)); xRotate.angleProperty().bind(angleX); yRotate.angleProperty().bind(angleY); zRotate.angleProperty().bind(angleZ); AnimationTimer animation = new AnimationTimer() { // 前回時間 private long previousHandledTime; // 角度 private double angle; // 回転速度 private final DoubleProperty angularVelocityProperty = new SimpleDoubleProperty(10.0d); @Override public void handle(long now) { if (previousHandledTime == 0) { previousHandledTime = now; return; } angle += angularVelocityProperty.get() * (now - previousHandledTime) / 1_000_000_000; previousHandledTime = now; // 23.5度傾けて自転させる。 sphere.getTransforms().setAll(new Rotate(23.5d, Rotate.Z_AXIS), new Rotate(-angle, Rotate.Y_AXIS)); } }; animation.start(); primaryStage.setTitle("JavaFX 3D EARTH"); primaryStage.setScene(scene); primaryStage.show(); } /** * @param args the command line arguments */ public static void main(String[] args) { launch(args); } } |
実行結果は下の動画のようになります。
AnimationTimer で地球を 23.5 度傾けて反時計回りに回転させているコードは次の部分です。
// 23.5度傾けて自転させる。
sphere.getTransforms().setAll(new Rotate(23.5d, Rotate.Z_AXIS), new Rotate(-angle, Rotate.Y_AXIS));
これを次のように記述してしまうと思い通りにいきません。
angleZ.set(23.50d);
angleY.set(angle);
うっかりこれやってしまうと Z 軸が 23.5 度傾いてから水平に反時計回りに回ってしまいます。
これはこの後のカメラを動かす場合でも同じように注意が必要となります。
せっかくここまで試したことだしもう少しだけ寄り道をしましょう。
自転する地球の周りに月を公転させてみます。
ポイントライトは太陽の位置とします。(大きさや距離に正確な値は使ってないです。適当です。)
今までの技術でさらっとできてしまいます。
|
1 2 3 4 5 6 7 8 9 10 11 12 13 14 15 16 17 18 19 20 21 22 23 24 25 26 27 28 29 30 31 32 33 34 35 36 37 38 39 40 41 42 43 44 45 46 47 48 49 50 51 52 53 54 55 56 57 58 59 60 61 62 63 64 65 66 67 68 69 70 71 72 73 74 75 76 77 78 79 80 81 82 83 84 85 86 87 88 89 90 91 92 93 94 95 96 97 98 99 100 101 102 103 104 105 106 107 108 109 110 111 112 113 114 115 116 117 118 119 120 121 122 123 124 125 126 127 128 129 130 131 132 133 134 135 136 137 138 139 140 141 142 143 144 145 146 147 148 149 150 151 152 153 154 155 156 157 158 159 160 161 162 163 164 165 166 167 168 169 170 171 172 173 174 175 176 177 178 179 180 181 182 183 184 185 186 187 188 189 190 191 192 193 194 195 196 197 198 199 200 201 202 203 204 205 206 207 208 209 210 211 212 213 214 215 216 217 218 219 220 221 222 223 224 225 226 227 228 229 230 231 232 233 234 235 236 |
package jp.yucchi.earth_moon; import javafx.animation.AnimationTimer; import javafx.application.Application; import javafx.beans.property.DoubleProperty; import javafx.beans.property.SimpleDoubleProperty; import javafx.scene.AmbientLight; import javafx.scene.Group; import javafx.scene.PerspectiveCamera; import javafx.scene.PointLight; import javafx.scene.Scene; import javafx.scene.SceneAntialiasing; import javafx.scene.image.Image; import javafx.scene.paint.Color; import javafx.scene.paint.PhongMaterial; import javafx.scene.shape.DrawMode; import javafx.scene.shape.Sphere; import javafx.scene.transform.Rotate; import javafx.stage.Stage; /** * * @author Yucchi */ public class Earth_Moon extends Application { static final double DISTANCE_MOON = 400.0d; static final double DISTANCE_SUN = 900.0d; // 座標 private double anchorAngleX; private double anchorAngleY; private final DoubleProperty angleX = new SimpleDoubleProperty(0d); private final DoubleProperty angleY = new SimpleDoubleProperty(0d); private final DoubleProperty angleZ = new SimpleDoubleProperty(0d); private double anchorX; private double anchorY; @Override public void start(Stage primaryStage) { final Group root = new Group(); // Earth final Sphere earth = new Sphere(100.0d); // フォンシェーディングを設定 final PhongMaterial earthMaterial = new PhongMaterial(); // DiffuseMap earthMaterial.setDiffuseMap( new Image(this.getClass().getResource("resources/earth_texture.jpg").toExternalForm(), 8_192 / 2.0d, 4_092 / 2.0d, true, true ) ); // BumpMap earthMaterial.setBumpMap( new Image(this.getClass().getResource("resources/earth_normalmap.jpg").toExternalForm(), 8_192 / 2.0d, 4_092 / 2.0d, true, true ) ); // SpecularMap earthMaterial.setSpecularMap( new Image(this.getClass().getResource("resources/earth_specularmap.jpg").toExternalForm(), 8_192 / 2.0d, 4_092 / 2.0d, true, true ) ); // 反射光色設定 earthMaterial.setSpecularColor(Color.WHITE); // 反射光の強さ設定 earthMaterial.setSpecularPower(2.5d); // マテリアルを設定 earth.setMaterial(earthMaterial); // ドローモードを設定 earth.setDrawMode(DrawMode.FILL); // Moon final Sphere moon = new Sphere(50.0d); // フォンシェーディングを設定 final PhongMaterial moonMaterial = new PhongMaterial(); // DiffuseMap moonMaterial.setDiffuseMap( new Image(this.getClass().getResource("resources/moon.jpg").toExternalForm(), 2_500 / 2.0d, 1_250 / 2.0d, true, true ) ); // 反射光色設定 moonMaterial.setSpecularColor(Color.LIGHTYELLOW); // マテリアルを設定 moon.setMaterial(moonMaterial); // ドローモードを設定 moon.setDrawMode(DrawMode.FILL); // Sun final Sphere sun = new Sphere(100.0d); // フォンシェーディングを設定 final PhongMaterial sunMaterial = new PhongMaterial(); // SelfIlluminationMap sunMaterial.setSelfIlluminationMap( new Image(this.getClass().getResource("resources/sun.jpg").toExternalForm(), 3_000.0d, 1_500.0d, true, true ) ); // マテリアルを設定 sun.setMaterial(sunMaterial); // ドローモードを設定 sun.setDrawMode(DrawMode.FILL); // 位置初期化 sun.setTranslateX(DISTANCE_SUN); // 透視投影カメラ final PerspectiveCamera cam = new PerspectiveCamera(true); // Field of View cam.setFieldOfView(45.5d); // Clipping Planes cam.setNearClip(1.0d); cam.setFarClip(1_000_000.0d); // カメラを 1500 後退させる。(Z 軸を -1500) cam.setTranslateZ(-1_500.0d); // アンビエントライト AmbientLight ambient = new AmbientLight(); ambient.setColor(Color.rgb(90, 90, 90, 0.6)); // ポイントライト PointLight point = new PointLight(); point.setColor(Color.WHITE); point.getScope().addAll(earth, moon); // ポイントライトを移動 point.setTranslateX(DISTANCE_SUN); root.getChildren().addAll(earth, moon, sun, ambient, point); Scene scene = new Scene(root, 1_360, 765, true, SceneAntialiasing.BALANCED); scene.setFill(Color.BLACK); scene.setCamera(cam); // マウスで pianoGroup 操作用 Rotate xRotate; Rotate yRotate; Rotate zRotate; root.getTransforms().setAll( xRotate = new Rotate(0, Rotate.X_AXIS), yRotate = new Rotate(0, Rotate.Y_AXIS), zRotate = new Rotate(0, Rotate.Z_AXIS) ); xRotate.angleProperty().bind(angleX); yRotate.angleProperty().bind(angleY); zRotate.angleProperty().bind(angleZ); root.setOnMousePressed(event -> { anchorX = event.getSceneX(); anchorY = event.getSceneY(); anchorAngleX = angleX.get(); anchorAngleY = angleY.get(); }); root.setOnMouseDragged(event -> { angleX.set(anchorAngleX - (anchorY - event.getSceneY())); angleY.set(anchorAngleY + anchorX - event.getSceneX()); }); AnimationTimer animation = new AnimationTimer() { // 前回時間 private long previousHandledTime; // 角度 private double angle; // 地球の回転速度 private final DoubleProperty earthAngularVelocityProperty = new SimpleDoubleProperty(810.0d); // 月の回転速度 private final DoubleProperty moonAngularVelocityProperty = new SimpleDoubleProperty(30.0d); // 月の方位角 private double azimuth; @Override public void handle(long now) { if (previousHandledTime == 0) { previousHandledTime = now; return; } // 地球 angle += earthAngularVelocityProperty.get() * (now - previousHandledTime) / 1_000_000_000; // 月 azimuth += moonAngularVelocityProperty.get() * (now - previousHandledTime) / 1_000_000_000.0d; previousHandledTime = now; // 地球を23.5度傾けて自転させる。 earth.getTransforms().setAll(new Rotate(23.5d, Rotate.Z_AXIS), new Rotate(-angle, Rotate.Y_AXIS)); // 月を回転させる。 moon.setTranslateX(Math.sin(Math.toRadians(azimuth)) * DISTANCE_MOON); moon.setTranslateZ(-1.0d * Math.cos(Math.toRadians(azimuth)) * DISTANCE_MOON); // 餅をついてるうさぎを常に地球に向けて回転させる。 moon.getTransforms().setAll(new Rotate(-1.0d * azimuth + 180.0d, Rotate.Y_AXIS)); } }; animation.start(); primaryStage.setTitle("Earth Moon"); primaryStage.setScene(scene); primaryStage.show(); } /** * @param args the command line arguments */ public static void main(String[] args) { launch(args); } } |
このプログラムの実行結果は次の動画のようになります。
この動画から解るように地球や月で太陽の光(ポイントライト)が遮られたときにできるはずの影ができません。
少し残念な結果となりました。
ちょっと脱線していまいましたが ToyPiano アプリケーションに必要な最後の機能をそろそろ紹介します。
カメラを動かす!
これができるようになったら ToyPiano アプリケーションで使っている 3D 関係の技術は全てあなたのものです。
32 鍵盤とみみっちいこと言わずに 88 鍵盤の本格的な 3D Piano アプリケーションだって作れるかもしれません。
それでは次のようなプログラムを組んでみましょう。
Cylinder を手前に45度傾けて、ピボットは最下部で一番手前の位置として表示させる。
これは今までの記事の中で簡単にできることが証明されています。
トグルボタンを適当に配置して、ボタンが押されたらカメラを Cylinder を中心に水平に回転させてみます。
もちろんカメラは常に Cylinder に向いてます。
これをアニメーション表示さてます。
トグルボタンを再度押してアニメーションを止めて初期状態に戻します。
この記事をここまで読んでくださった方は X, Z 軸の位置を計算して移動させて、カメラが Cylinder の中心に向かうように
Y 軸を回転させればいいだけじゃん。って思ったでしょう。
おそらく多くの方は次のようなプログラムを思いつくのではないかと思います。
|
1 2 3 4 5 6 7 8 9 10 11 12 13 14 15 16 17 18 19 20 21 22 23 24 25 26 27 28 29 30 31 32 33 34 35 36 37 38 39 40 41 42 43 44 45 46 47 48 49 50 51 52 53 54 55 56 57 58 59 60 61 62 63 64 65 66 67 68 69 70 71 72 73 74 75 76 77 78 79 80 81 82 83 84 85 86 87 88 89 90 91 92 93 94 95 96 97 98 99 100 101 102 103 104 105 106 107 108 109 110 111 112 113 114 115 116 117 118 119 120 121 122 123 124 125 126 127 128 129 130 131 132 133 134 135 136 137 138 139 140 141 142 143 144 145 146 147 148 149 150 151 152 153 154 155 156 157 158 159 160 161 162 163 164 165 166 167 168 169 170 |
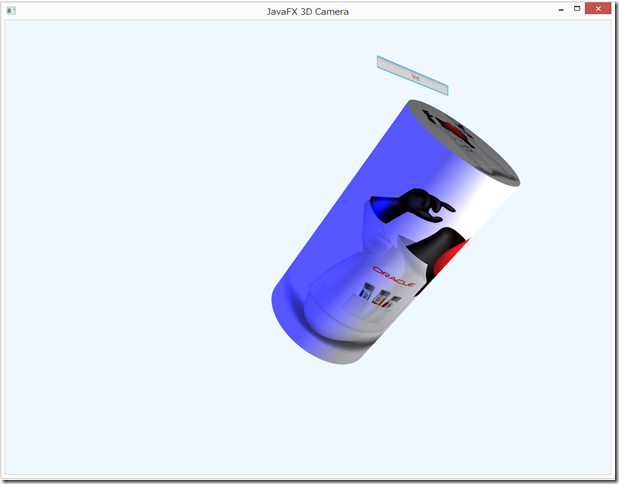
package jp.yucchi.javafx3d_camera; import javafx.animation.AnimationTimer; import javafx.application.Application; import javafx.scene.AmbientLight; import javafx.scene.Group; import javafx.scene.PerspectiveCamera; import javafx.scene.PointLight; import javafx.scene.Scene; import javafx.scene.SceneAntialiasing; import javafx.scene.control.ToggleButton; import javafx.scene.image.Image; import javafx.scene.layout.GridPane; import javafx.scene.paint.Color; import javafx.scene.paint.PhongMaterial; import javafx.scene.shape.Cylinder; import javafx.scene.transform.Rotate; import javafx.stage.Stage; /** * * @author Yucchi */ public class JavaFX3D_Camera extends Application { // アニメーションタイマー private AnimationTimer anim; @Override public void start(Stage primaryStage) { final Group root = new Group(); // Cylinder final Cylinder cylinder = new Cylinder(100.0d, 400.0d); // Cylinder を手前に45度傾ける。ピボットは最下部で一番手前の位置とする cylinder.getTransforms().setAll(new Rotate(45.0d, 0.0d, 200.0d, -100.0d, Rotate.X_AXIS)); // フォンシェーディングを設定 final PhongMaterial material = new PhongMaterial(); // テクスチャを貼る。 Image diffuseMap = new Image(this.getClass().getResource("resources/Duke.jpg").toExternalForm()); material.setDiffuseMap(diffuseMap); cylinder.setMaterial(material); material.setDiffuseColor(Color.GHOSTWHITE); material.setSpecularColor(Color.WHITE); cylinder.setMaterial(material); // 環境光設定 final AmbientLight ambient = new AmbientLight(); ambient.setColor(Color.rgb(90, 90, 90, 0.6)); ambient.getScope().addAll(cylinder); // ポイントライト設定 PointLight point = new PointLight(); point.setColor(Color.BLUE); point.setLayoutX(-500.0d); point.setLayoutY(0.0d); point.setTranslateZ(0.0d); point.getScope().addAll(cylinder); PointLight point2 = new PointLight(); point2.setColor(Color.RED); point2.setLayoutX(500.0d); point2.setLayoutY(0.0d); point2.setTranslateZ(0.0d); point2.getScope().addAll(cylinder); PointLight point3 = new PointLight(); point3.setColor(Color.WHITE); point3.setLayoutX(0.0d); point3.setLayoutY(0.0d); point3.setTranslateZ(-500.0d); point3.getScope().addAll(cylinder); // 四つ目のポイントライト効果無し(>_<。) PointLight point4 = new PointLight(); point4.setColor(Color.WHITE); point4.setLayoutX(0.0d); point4.setLayoutY(0.0d); point4.setTranslateZ(500.0d); point4.getScope().addAll(cylinder); // 透視投影カメラ final PerspectiveCamera cam = new PerspectiveCamera(true); // Field of View cam.setFieldOfView(45.5d); // Clipping Planes cam.setNearClip(1.0d); cam.setFarClip(1_000_000.0d); // カメラを 1000 後退させる。(Z 軸を -1000) cam.setTranslateZ(-1_000.0d); // アニメーション開始、終了(リセット)トグルボタン ToggleButton moveCameraButton = new ToggleButton("Horizontal rotation"); moveCameraButton.setPrefSize(300.0d, 25.0d); GridPane grid = new GridPane(); grid.add(moveCameraButton, 0, 0, 1, 1); // 原点が中央の為、生肉、焼肉、苦肉の処理 grid.setLayoutY(-768.0d / 2.0d - 25.0d); grid.setLayoutX(1024.0d / 2.0d - 300.0d); moveCameraButton.setOnAction(ae -> { if (moveCameraButton.isSelected()) { moveCameraButton.setText("Reset"); anim = new AnimationTimer() { // カメラ用アニメーション // 方位角 private double azimuth; // 前回時間 private long previousHandledTime; // 回転速度 private final double angularVelocity = 15.0d; // 半径 private final double radius = 1_000.0d; @Override public void handle(long now) { if (previousHandledTime == 0) { previousHandledTime = now; return; } // 水平回転処理 azimuth += angularVelocity * (now - previousHandledTime) / 1_000_000_000; previousHandledTime = now; cam.setTranslateX(Math.sin(Math.toRadians(azimuth)) * radius); cam.setTranslateZ(-1.0d * Math.cos(Math.toRadians(azimuth)) * radius); cam.getTransforms().setAll(new Rotate(-1 * azimuth, Rotate.Y_AXIS)); } }; anim.start(); } else { // アニメーションストップ、リセット anim.stop(); moveCameraButton.setText("Horizontal rotation"); cam.setTranslateX(0.0d); cam.setTranslateZ(-1000.0d); cam.getTransforms().setAll(new Rotate(0.0d, 0.0d, 0.0d)); } }); root.getChildren().addAll(cylinder, ambient, point, point2, point3, point4, grid); Scene scene = new Scene(root, 1_024, 768, true, SceneAntialiasing.BALANCED); scene.setFill(Color.ALICEBLUE); scene.setCamera(cam); primaryStage.setTitle("JavaFX 3D Camera"); primaryStage.setScene(scene); primaryStage.show(); } /** * @param args the command line arguments */ public static void main(String[] args) { launch(args); } } |
このプログラムの実行結果は下図のようになります。
なんかとんでもないことになってますね。
動画はこちらです。
カメラを動かすとトグルボタンも平べったい平面上に配置されている状態なのが確認されました。
ちょっとこれはまずいです。
トグルボタンが押しにくいじゃありませんか!(そこか!?
ちなみにこのトグルボタンはちゃんと機能します。(^_^;)
特にこのプログラムを説明するところは無いのですが、何故か四つ目のポイントライトが効きません。
カメラが回転していることを解りやすくするために四方から PointLight を当てようとしたのですが・・・
PointLight の件はちょっと解らないので深く追求せずに肝心の問題に移ります。( ̄。 ̄;)
このように UI 用のオブジェクト(コントロール)などを今まで通りに撮して、3D オブジェクトを撮す場合に影響を及ぼさないようにするにはどうすればいいのか?
実はこの問題を簡単に解決するために特別な Node が用意されています。
javafx.scene.SubScene です。
これを使って今までの 2D 用と 3D 用を分離させてしまいます。
カメラも 3D 用に( SubScene 用 ) 別に一つだけ特別に用意されています。
それではこのプログラムを SubScene を使って期待通りに動くようにしましょう。
先ほどのプログラムと見た目は違うけどやってることは同じです。
コントロールの配置がこれで自在にできるので先ほどのプログラムとこの部分は随分違ってます。
また、Scene 用のカメラが定義されてないのですが心配には及びません。
デフォルトのカメラが利用されてコントロールは表示されます。
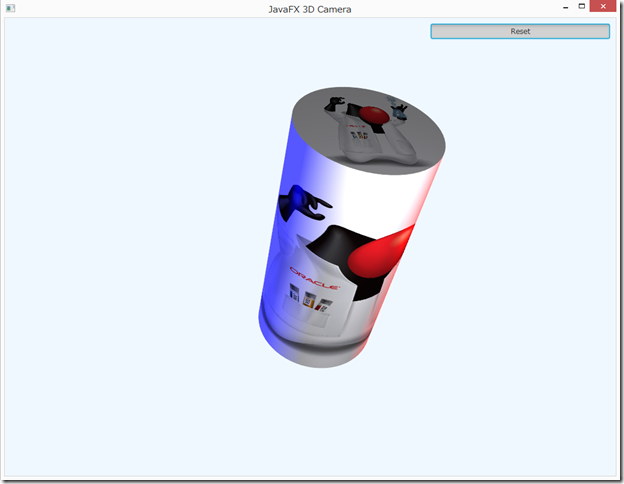
Cylinder を撮すために回転しているカメラは SubScene に設定された専用のカメラなので先ほどのプログラムのように UI (コントロール)まで撮しません。
実に合理的にこの問題を解決していますね。
それでは SubScene を使って改善されたプログラム見てみましょう。
|
1 2 3 4 5 6 7 8 9 10 11 12 13 14 15 16 17 18 19 20 21 22 23 24 25 26 27 28 29 30 31 32 33 34 35 36 37 38 39 40 41 42 43 44 45 46 47 48 49 50 51 52 53 54 55 56 57 58 59 60 61 62 63 64 65 66 67 68 69 70 71 72 73 74 75 76 77 78 79 80 81 82 83 84 85 86 87 88 89 90 91 92 93 94 95 96 97 98 99 100 101 102 103 104 105 106 107 108 109 110 111 112 113 114 115 116 117 118 119 120 121 122 123 124 125 126 127 128 129 130 131 132 133 134 135 136 137 138 139 140 141 142 143 144 145 146 147 148 149 150 151 152 153 154 155 156 157 158 159 160 161 162 163 164 165 166 167 168 169 170 171 172 173 174 175 176 177 178 179 180 181 182 183 184 185 186 187 188 189 190 191 192 193 194 195 196 197 198 199 200 |
package jp.yucchi.javafx3d_camera; import javafx.animation.AnimationTimer; import javafx.application.Application; import javafx.scene.AmbientLight; import javafx.scene.Group; import javafx.scene.Parent; import javafx.scene.PerspectiveCamera; import javafx.scene.PointLight; import javafx.scene.Scene; import javafx.scene.SceneAntialiasing; import javafx.scene.SubScene; import javafx.scene.control.ToggleButton; import javafx.scene.image.Image; import javafx.scene.layout.AnchorPane; import javafx.scene.layout.GridPane; import javafx.scene.paint.Color; import javafx.scene.paint.PhongMaterial; import javafx.scene.shape.Cylinder; import javafx.scene.transform.Rotate; import javafx.stage.Stage; /** * * @author Yucchi */ public class JavaFX3D_Camera extends Application { // アニメーションタイマー private AnimationTimer anim; // 透視投影カメラ private PerspectiveCamera subCam; @Override public void start(Stage primaryStage) { // SubScene final SubScene subScene = createSubScene(); // UI コントロール用 final Parent controlScene = createControlScene(); // UI コントロール配置用 final AnchorPane root = new AnchorPane(); AnchorPane.setRightAnchor(controlScene, 10.0d); AnchorPane.setTopAnchor(controlScene, 10.0d); root.getChildren().addAll(subScene, controlScene); final Scene scene = new Scene(root, 1_024, 768, true); primaryStage.setTitle("JavaFX 3D Camera"); primaryStage.setScene(scene); primaryStage.show(); } /** * @param args the command line arguments */ public static void main(String[] args) { launch(args); } private SubScene createSubScene() { // SubScene 用グループ final Group subGroup = new Group(); // Cylinder final Cylinder cylinder = new Cylinder(100.0d, 400.0d); // Cylinder を手前に45度傾ける。ピボットは最下部で一番手前の位置とする cylinder.getTransforms().setAll(new Rotate(45.0d, 0.0d, 200.0d, -100.0d, Rotate.X_AXIS)); // フォンシェーディングを設定 final PhongMaterial material = new PhongMaterial(); // テクスチャを貼る。 Image diffuseMap = new Image(this.getClass().getResource("resources/Duke.jpg").toExternalForm()); material.setDiffuseMap(diffuseMap); cylinder.setMaterial(material); material.setDiffuseColor(Color.GHOSTWHITE); material.setSpecularColor(Color.WHITE); cylinder.setMaterial(material); // 環境光設定 final AmbientLight ambient = new AmbientLight(); ambient.setColor(Color.rgb(90, 90, 90, 0.6)); ambient.getScope().addAll(cylinder); // ポイントライト設定 PointLight point = new PointLight(); point.setColor(Color.BLUE); point.setLayoutX(-500.0d); point.setLayoutY(0.0d); point.setTranslateZ(0.0d); point.getScope().addAll(cylinder); PointLight point2 = new PointLight(); point2.setColor(Color.RED); point2.setLayoutX(500.0d); point2.setLayoutY(0.0d); point2.setTranslateZ(0.0d); point2.getScope().addAll(cylinder); PointLight point3 = new PointLight(); point3.setColor(Color.WHITE); point3.setLayoutX(0.0d); point3.setLayoutY(0.0d); point3.setTranslateZ(-500.0d); point3.getScope().addAll(cylinder); // 四つ目のポイントライト効果無し(>_<。) PointLight point4 = new PointLight(); point4.setColor(Color.WHITE); point4.setLayoutX(0.0d); point4.setLayoutY(0.0d); point4.setTranslateZ(500.0d); point4.getScope().addAll(cylinder); // 透視投影カメラ subCam = new PerspectiveCamera(true); // Field of View subCam.setFieldOfView(45.5d); // Clipping Planes subCam.setNearClip(1.0d); subCam.setFarClip(1_000_000.0d); // カメラを 1000 後退させる。(Z 軸を -1000) subCam.setTranslateZ(-1_000.0d); subGroup.getChildren().addAll(cylinder, ambient, point, point2, point3, point4); SubScene subScene = new SubScene(subGroup, 1_024, 768, true, SceneAntialiasing.BALANCED); subScene.setFill(Color.ALICEBLUE); subScene.setCamera(subCam); return subScene; } private Parent createControlScene() { // アニメーション開始、終了(リセット)トグルボタン ToggleButton moveCameraButton = new ToggleButton("Horizontal rotation"); moveCameraButton.setPrefSize(300.0d, 25.0d); GridPane grid = new GridPane(); grid.add(moveCameraButton, 0, 0, 1, 1); moveCameraButton.setOnAction(ae -> { if (moveCameraButton.isSelected()) { moveCameraButton.setText("Reset"); anim = new AnimationTimer() { // カメラ用アニメーション // 方位角 private double azimuth; // 前回時間 private long previousHandledTime; // 回転速度 private final double angularVelocity = 15.0d; // 半径 private final double radius = 1_000.0d; @Override public void handle(long now) { if (previousHandledTime == 0) { previousHandledTime = now; return; } // 水平回転処理 azimuth += angularVelocity * (now - previousHandledTime) / 1_000_000_000; previousHandledTime = now; subCam.setTranslateX(Math.sin(Math.toRadians(azimuth)) * radius); subCam.setTranslateZ(-1.0d * Math.cos(Math.toRadians(azimuth)) * radius); subCam.getTransforms().setAll(new Rotate(-1 * azimuth, Rotate.Y_AXIS)); } }; anim.start(); } else { // アニメーションストップ、リセット anim.stop(); moveCameraButton.setText("Horizontal rotation"); subCam.setTranslateX(0.0d); subCam.setTranslateZ(-1_000.0d); subCam.getTransforms().setAll(new Rotate(0.0d, 0.0d, 0.0d)); } }); return grid; } } |
SubScene って簡単に便利に使えますね!(^_^)
プログラムの実行結果は次のようになります。
ToyPiano アプリケーションを作るために必要な JavaFX 3D API はこれで全てです。
JavaFX は標準で 3D API を持っているからちょっとしたことなら簡単に使うことができます。
仕事では使う機会がないかもしれませんが息抜きに遊んでみるのもいいかもしれませんね。(^_^)
長くなってしまいますが鍵盤数を減らした完成版のプログラムを載せておきます。
私はスーパーサイヤ人並の素人なのでいつもながら汚いコードですが参考になれば幸いです。
間違い、アドバイス等は大歓迎ですのでお気付きの点があればご教示くださいませ。
|
1 2 3 4 5 6 7 8 9 10 11 12 13 14 15 16 17 18 19 20 |
package jp.yucchi.toypiano; import javafx.scene.media.AudioClip; import javafx.scene.shape.Box; /** * * @author Yucchi */ public interface PressedAction { double WHITE_KEYBOARD_DOWN_ANGLE = 4.0d; double BLACK_KEYBOARD_DOWN_ANGLE = 5.5d; void pressedWhiteKeyBoard(AudioClip ac, Box keyBoard, double keyBoardDepth); void pressedBlackKeyBoard(AudioClip ac, Box keyBoard, double keyBoardDepth); } |
|
1 2 3 4 5 6 7 8 9 10 11 12 13 |
package jp.yucchi.toypiano; import javafx.scene.shape.Box; /** * * @author Yucchi */ public interface ReleasedAction { void releasedKeyBoard(Box keyBoard); } |
|
1 2 3 4 5 6 7 8 9 10 11 12 13 14 |
package jp.yucchi.toypiano; import java.util.List; import javafx.scene.input.TouchEvent; import javafx.scene.shape.Box; /** * * @author Yucchi */ public interface Recording { void recordingEvent(boolean recording, List<EventRecording> eventRecording, long actionEventTime, Box keyboard, TouchEvent te); } |
|
1 2 3 4 5 6 7 8 9 10 11 |
package jp.yucchi.toypiano; /** * * @author Yucchi */ public interface PianoAction extends PressedAction, ReleasedAction, Recording { // 白さが眩しいインターフェース } |
|
1 2 3 4 5 6 7 8 9 10 11 12 13 14 15 16 17 18 19 20 21 22 23 24 25 26 27 28 29 30 31 32 33 34 35 |
package jp.yucchi.toypiano; import java.io.Serializable; /** * * @author Yucchi */ public class EventRecording implements Serializable { private static final long serialVersionUID = 1L; private final long eventTime; private final String eventProducer; private final String eventType; public EventRecording(long eventTime, String eventProducer, String eventType) { this.eventTime = eventTime; this.eventProducer = eventProducer; this.eventType = eventType; } public long getEventTime() { return eventTime; } public String getEventProducer() { return eventProducer; } public String getEventType() { return eventType; } } |
|
1 2 3 4 5 6 7 8 9 10 11 12 13 14 15 16 17 18 19 20 21 22 23 24 25 26 27 28 29 30 31 32 33 34 35 36 37 38 39 40 41 42 43 44 45 46 47 48 49 50 51 52 53 54 55 56 57 58 59 60 61 62 63 64 65 66 67 68 69 70 71 72 73 74 75 76 77 78 79 80 81 82 83 84 85 86 87 88 89 90 91 92 93 94 95 96 97 98 99 100 101 102 103 104 105 106 107 108 109 110 111 112 113 114 115 116 117 118 119 120 121 122 123 124 125 126 127 128 129 130 131 132 133 134 135 136 137 138 139 140 141 142 143 144 145 146 147 148 149 150 151 152 153 154 155 156 157 158 159 160 161 162 163 164 165 166 167 168 169 170 171 172 173 174 175 176 177 178 179 180 181 182 183 184 185 186 187 188 189 190 191 192 193 194 195 196 197 198 199 200 201 202 203 204 205 206 207 208 209 210 211 212 213 214 215 216 217 218 219 220 221 222 223 224 225 226 227 228 229 230 231 232 233 234 235 236 237 238 239 240 241 242 243 244 245 246 247 248 249 250 251 252 253 254 255 256 257 258 259 260 261 262 263 264 265 266 267 268 269 270 271 272 273 274 275 276 277 278 279 280 281 282 283 284 285 286 287 288 289 290 291 292 293 294 295 296 297 298 299 300 301 302 303 304 305 306 307 308 309 310 311 312 313 314 315 316 317 318 319 320 321 322 323 324 325 326 327 328 329 330 331 332 333 334 335 336 337 338 339 340 341 342 343 344 345 346 347 348 349 350 351 352 353 354 355 356 357 358 359 360 361 362 363 364 365 366 367 368 369 370 371 372 373 374 375 376 377 378 379 380 381 382 383 384 385 386 387 388 389 390 391 392 393 394 395 396 397 398 399 400 401 402 403 404 405 406 407 408 409 410 411 412 413 414 415 416 417 418 419 420 421 422 423 424 425 426 427 428 429 430 431 432 433 434 435 436 437 438 439 440 441 442 443 444 445 446 447 448 449 450 451 452 453 454 455 456 457 458 459 460 461 462 463 464 465 466 467 468 469 470 471 472 473 474 475 476 477 478 479 480 481 482 483 484 485 486 487 488 489 490 491 492 493 494 495 496 497 498 499 500 501 502 503 504 505 506 507 508 509 510 511 512 513 514 515 516 517 518 519 520 521 522 523 524 525 526 527 528 529 530 531 532 533 534 535 536 537 538 539 540 541 542 543 544 545 546 547 548 549 550 551 552 553 554 555 556 557 558 559 560 561 562 563 564 565 566 567 568 569 570 571 572 573 574 575 576 577 578 579 580 581 582 583 584 585 586 587 588 589 590 591 592 593 594 595 596 597 598 599 600 601 602 603 604 605 606 607 608 609 610 611 612 613 614 615 616 617 618 619 620 621 622 623 624 625 626 627 628 629 630 631 632 633 634 635 636 637 638 639 640 641 642 643 644 645 646 647 648 649 650 651 652 653 654 655 656 657 658 659 660 661 662 663 664 665 666 667 668 669 670 671 672 673 674 675 676 677 678 679 680 681 682 683 684 685 686 687 688 689 690 691 692 693 694 695 696 697 698 699 700 701 702 703 704 705 706 707 708 709 710 711 712 713 714 715 716 717 718 719 720 721 722 723 724 725 726 727 728 729 730 731 732 733 734 735 736 737 738 739 740 741 742 743 744 745 746 747 748 749 750 751 752 753 754 755 756 757 758 759 760 761 762 763 764 765 766 767 768 769 770 771 772 773 774 775 776 777 778 779 780 781 782 783 784 785 786 787 788 789 790 791 792 793 794 795 796 797 798 799 800 801 802 803 804 805 806 807 808 809 810 811 812 813 814 815 816 817 818 819 820 821 822 823 824 825 826 827 828 829 830 831 832 833 834 835 836 837 838 839 840 841 842 843 844 845 846 847 848 849 850 851 852 853 854 855 856 857 858 859 860 861 862 863 864 865 866 867 868 869 870 871 872 873 874 875 876 877 878 879 880 881 882 883 884 885 886 887 888 889 890 891 892 893 894 |
package jp.yucchi.toypiano; import java.io.File; import java.io.FileInputStream; import java.io.FileNotFoundException; import java.io.FileOutputStream; import java.io.IOException; import java.io.ObjectInputStream; import java.io.ObjectOutputStream; import java.util.ArrayList; import java.util.List; import java.util.logging.Level; import java.util.logging.Logger; import javafx.animation.AnimationTimer; import javafx.animation.Interpolator; import javafx.animation.KeyFrame; import javafx.animation.KeyValue; import javafx.animation.Timeline; import javafx.application.Application; import javafx.application.Platform; import javafx.beans.property.DoubleProperty; import javafx.beans.property.SimpleDoubleProperty; import javafx.geometry.HPos; import javafx.scene.AmbientLight; import javafx.scene.Cursor; import javafx.scene.Group; import javafx.scene.Node; import javafx.scene.Parent; import javafx.scene.PerspectiveCamera; import javafx.scene.PointLight; import javafx.scene.Scene; import javafx.scene.SceneAntialiasing; import javafx.scene.SubScene; import javafx.scene.control.Button; import javafx.scene.control.ToggleButton; import javafx.scene.image.Image; import javafx.scene.input.KeyCode; import javafx.scene.input.TouchEvent; import javafx.scene.layout.AnchorPane; import javafx.scene.layout.GridPane; import javafx.scene.layout.Region; import javafx.scene.media.AudioClip; import javafx.scene.paint.Color; import javafx.scene.paint.PhongMaterial; import javafx.scene.shape.Box; import javafx.scene.shape.DrawMode; import javafx.scene.transform.Rotate; import javafx.stage.FileChooser; import javafx.stage.Stage; import javafx.util.Duration; /** * * @author Yucchi */ public class ToyPiano extends Application implements PianoAction { // ピアノ private Group pianoGroup; // ピアノポジション private final DoubleProperty pxPos = new SimpleDoubleProperty(0.0d); private final DoubleProperty pyPos = new SimpleDoubleProperty(0.0d); private final DoubleProperty pzPos = new SimpleDoubleProperty(0.0d); // サブカメラ private PerspectiveCamera subCam; // サブカメラ移動 private final DoubleProperty xPos = new SimpleDoubleProperty(0.0d); private final DoubleProperty yPos = new SimpleDoubleProperty(0.0d); private final DoubleProperty zPos = new SimpleDoubleProperty(-600.0d); // サブカメラ回転 private final DoubleProperty rxPos = new SimpleDoubleProperty(0.0d); private final DoubleProperty ryPos = new SimpleDoubleProperty(0.0d); private final DoubleProperty rzPos = new SimpleDoubleProperty(0.0d); // 座標 private double anchorAngleX; private double anchorAngleY; private final DoubleProperty angleX = new SimpleDoubleProperty(0d); private final DoubleProperty angleY = new SimpleDoubleProperty(0d); private final DoubleProperty angleZ = new SimpleDoubleProperty(0d); private double anchorX; private double anchorY; private ToggleButton openCloseButton; private Button recordingButton; private Button stopButton; private Button playbackButton; private Button saveButton; private Button loadButton; private FileChooser fileChooser; private Box keyboard_f; private Box keyboard_g; private Box keyboard_a; private Box keyboard_b; private Box keyboard_f_s; private Box keyboard_g_s; private Box keyboard_a_s; private boolean recording; private List<EventRecording> eventRecording; private long actionEventTime; private long recordingLastTime; private AnimationTimer recordingAnimation; private AnimationTimer playbackAnimation; private AudioClip f; private AudioClip f_s; private AudioClip g; private AudioClip g_s; private AudioClip a; private AudioClip a_s; private AudioClip b; private AudioClip dameyo; private double whiteKeyBoardDepth; private double blackKeyBoardDepth; private boolean activePlayback; private int touchPressedCount; // ラムダ式からアクセス 取扱注意 private int touchReleasedCount; // ラムダ式からアクセス 取扱注意 private Cursor cursor; @Override public void start(Stage primaryStage) { final SubScene subScene = createSubScene(); final Parent controlScene = createControlScene(); final AnchorPane root = new AnchorPane(); root.getChildren().addAll(subScene, controlScene); AnchorPane.setRightAnchor(controlScene, 0.0d); final Scene scene = new Scene(root, 1_920, 1_080, true); // プレイバック以外のタッチドラッグを禁止させるために subScene.setOnTouchPressed(te -> { touchPressedCount++; // フィールドへアクセス 取扱注意 }); subScene.setOnTouchReleased(te -> { touchReleasedCount++; // フィールドへアクセス 取扱注意 }); // マウスで pianoGroup 操作用 Rotate xRotate; Rotate yRotate; Rotate zRotate; pianoGroup.getTransforms().setAll( xRotate = new Rotate(0, Rotate.X_AXIS), yRotate = new Rotate(0, Rotate.Y_AXIS), zRotate = new Rotate(0, Rotate.Z_AXIS) ); xRotate.angleProperty().bind(angleX); yRotate.angleProperty().bind(angleY); zRotate.angleProperty().bind(angleZ); subScene.setOnMousePressed(event -> { anchorX = event.getSceneX(); anchorY = event.getSceneY(); anchorAngleX = angleX.get(); anchorAngleY = angleY.get(); }); subScene.setOnMouseDragged(event -> { if (touchPressedCount == touchReleasedCount || activePlayback) { angleX.set(anchorAngleX - (anchorY - event.getSceneY())); angleY.set(anchorAngleY + anchorX - event.getSceneX()); } }); pianoGroup.translateXProperty().bindBidirectional(pxPos); pianoGroup.translateYProperty().bindBidirectional(pyPos); pianoGroup.translateZProperty().bindBidirectional(pzPos); // ALT + E キーでアプリケーション終了 root.setOnKeyPressed(key -> { if (key.getCode() == KeyCode.E && key.isAltDown()) { Platform.exit(); System.exit(0); } }); // Icon 設定 Image myIcon = new Image(this.getClass().getResource("resources/sakura_icon.png").toExternalForm()); primaryStage.getIcons().add(myIcon); primaryStage.setTitle("Java FX ToyPiano"); primaryStage.setScene(scene); primaryStage.setResizable(false); primaryStage.setFullScreen(true); primaryStage.setFullScreenExitHint("ESC: Full-screen mode end." + "\nALT + E: Application Exit."); primaryStage.show(); // オプション操作用 UI を閉じておく openCloseButton.fire(); // オープニングアニメーション openAnimation(); // ファイルチューザ fileChooser = new FileChooser(); fileChooser.setInitialDirectory(new File(System.getProperty("user.home"))); fileChooser.getExtensionFilters() .addAll(new FileChooser.ExtensionFilter("Piano Files", "*.pia"), new FileChooser.ExtensionFilter("All Files", "*.*")); } /** * @param args the command line arguments */ public static void main(String[] args) { launch(args); } private SubScene createSubScene() { // ピアノグループ pianoGroup = new Group(); // ピアノの音源 f = new AudioClip(this.getClass().getResource("resources/F.wav").toExternalForm()); f_s = new AudioClip(this.getClass().getResource("resources/F_S.wav").toExternalForm()); g = new AudioClip(this.getClass().getResource("resources/G.wav").toExternalForm()); g_s = new AudioClip(this.getClass().getResource("resources/G_S.wav").toExternalForm()); a = new AudioClip(this.getClass().getResource("resources/A.wav").toExternalForm()); a_s = new AudioClip(this.getClass().getResource("resources/A_S.wav").toExternalForm()); b = new AudioClip(this.getClass().getResource("resources/B.wav").toExternalForm()); dameyo = new AudioClip(this.getClass().getResource("resources/Dameyo.wav").toExternalForm()); // ピアノ // 白鍵盤 final double whiteKeyBoardWidth = 30.0d; final double whiteKeyBoardHeight = 30.0d; whiteKeyBoardDepth = whiteKeyBoardWidth * 6; // 黒鍵盤 final double blackKeyBoardWidth = whiteKeyBoardWidth * 0.7; final double blackKeyBoardHeight = 30.0d; blackKeyBoardDepth = whiteKeyBoardDepth * 0.6; final double blackKeyBoardGap = whiteKeyBoardWidth * 0.15; // 白鍵盤の間隙 final double whiteKeyBoardGap = 2.0d; // ボディ final double bodyHeight = 50.0d; final double bodyDepth = 350.0d; final double bodyWidth = whiteKeyBoardWidth * 20 + whiteKeyBoardGap * 18; // 白鍵盤左端配置開始位置 final double xStart = -(bodyWidth / 2) + whiteKeyBoardWidth; // 白鍵盤の位置ががボディより手前に収まるようにマージン設定 final double depthMargin = 15d; // ボディ マテリアル final PhongMaterial bodyMaterial = new PhongMaterial(); bodyMaterial.setDiffuseColor(Color.RED); bodyMaterial.setSpecularColor(Color.TOMATO); // 白鍵盤 マテリアル final PhongMaterial whiteKeyBoardPhongMaterial = new PhongMaterial(); whiteKeyBoardPhongMaterial.setDiffuseColor(Color.GHOSTWHITE); whiteKeyBoardPhongMaterial.setSpecularColor(Color.WHITE); // 黒鍵盤 マテリアル final PhongMaterial blackKeyBoardPhongMaterial = new PhongMaterial(); blackKeyBoardPhongMaterial.setDiffuseColor(Color.DIMGRAY); blackKeyBoardPhongMaterial.setSpecularColor(Color.DARKGRAY); final Box body = new Box(bodyWidth, bodyHeight, bodyDepth); body.setMaterial(bodyMaterial); body.setDrawMode(DrawMode.FILL); final Box body2 = new Box(bodyWidth, bodyHeight, bodyDepth - whiteKeyBoardDepth - depthMargin); body2.setMaterial(bodyMaterial); body2.setDrawMode(DrawMode.FILL); body2.setTranslateY(-bodyHeight); body2.setTranslateZ(bodyDepth / 2 - (bodyDepth - whiteKeyBoardDepth - depthMargin) / 2); keyboard_f = new Box(whiteKeyBoardWidth, whiteKeyBoardHeight, whiteKeyBoardDepth); keyboard_f.setUserData("F"); keyboard_f.setMaterial(whiteKeyBoardPhongMaterial); keyboard_f.setDrawMode(DrawMode.FILL); keyboard_f.setTranslateX(xStart); keyboard_f.setTranslateY(-bodyHeight / 2); keyboard_f.setTranslateZ(-(bodyDepth / 2 - whiteKeyBoardDepth / 2) + depthMargin); keyboard_g = new Box(whiteKeyBoardWidth, whiteKeyBoardHeight, whiteKeyBoardDepth); keyboard_g.setUserData("G"); keyboard_g.setMaterial(whiteKeyBoardPhongMaterial); keyboard_g.setDrawMode(DrawMode.FILL); keyboard_g.setTranslateX(xStart + whiteKeyBoardGap + whiteKeyBoardWidth); keyboard_g.setTranslateY(-bodyHeight / 2); keyboard_g.setTranslateZ(-(bodyDepth / 2 - whiteKeyBoardDepth / 2) + depthMargin); keyboard_a = new Box(whiteKeyBoardWidth, whiteKeyBoardHeight, whiteKeyBoardDepth); keyboard_a.setUserData("A"); keyboard_a.setMaterial(whiteKeyBoardPhongMaterial); keyboard_a.setDrawMode(DrawMode.FILL); keyboard_a.setTranslateX(xStart + whiteKeyBoardGap * 2 + whiteKeyBoardWidth * 2); keyboard_a.setTranslateY(-bodyHeight / 2); keyboard_a.setTranslateZ(-(bodyDepth / 2 - whiteKeyBoardDepth / 2) + depthMargin); keyboard_b = new Box(whiteKeyBoardWidth, whiteKeyBoardHeight, whiteKeyBoardDepth); keyboard_b.setUserData("B"); keyboard_b.setMaterial(whiteKeyBoardPhongMaterial); keyboard_b.setDrawMode(DrawMode.FILL); keyboard_b.setTranslateX(xStart + whiteKeyBoardGap * 3 + whiteKeyBoardWidth * 3); keyboard_b.setTranslateY(-bodyHeight / 2); keyboard_b.setTranslateZ(-(bodyDepth / 2 - whiteKeyBoardDepth / 2) + depthMargin); keyboard_f_s = new Box(blackKeyBoardWidth, blackKeyBoardHeight, blackKeyBoardDepth); keyboard_f_s.setUserData("F_S"); keyboard_f_s.setMaterial(blackKeyBoardPhongMaterial); keyboard_f_s.setDrawMode(DrawMode.FILL); keyboard_f_s.setTranslateX(xStart + whiteKeyBoardWidth / 2 + whiteKeyBoardGap / 2 - blackKeyBoardGap); keyboard_f_s.setTranslateY(-(bodyHeight / 2 + whiteKeyBoardHeight / 2)); keyboard_f_s.setTranslateZ(whiteKeyBoardDepth - blackKeyBoardDepth / 2 - bodyDepth / 2 + depthMargin); keyboard_g_s = new Box(blackKeyBoardWidth, blackKeyBoardHeight, blackKeyBoardDepth); keyboard_g_s.setUserData("G_S"); keyboard_g_s.setMaterial(blackKeyBoardPhongMaterial); keyboard_g_s.setDrawMode(DrawMode.FILL); keyboard_g_s.setTranslateX(xStart + whiteKeyBoardWidth / 2 + whiteKeyBoardGap / 2 + whiteKeyBoardWidth + whiteKeyBoardGap); keyboard_g_s.setTranslateY(-(bodyHeight / 2 + whiteKeyBoardHeight / 2)); keyboard_g_s.setTranslateZ(whiteKeyBoardDepth - blackKeyBoardDepth / 2 - bodyDepth / 2 + depthMargin); keyboard_a_s = new Box(blackKeyBoardWidth, blackKeyBoardHeight, blackKeyBoardDepth); keyboard_a_s.setUserData("A_S"); keyboard_a_s.setMaterial(blackKeyBoardPhongMaterial); keyboard_a_s.setDrawMode(DrawMode.FILL); keyboard_a_s.setTranslateX(xStart + whiteKeyBoardWidth / 2 + whiteKeyBoardGap / 2 + (whiteKeyBoardWidth + whiteKeyBoardGap) * 2 + blackKeyBoardGap); keyboard_a_s.setTranslateY(-(bodyHeight / 2 + whiteKeyBoardHeight / 2)); keyboard_a_s.setTranslateZ(whiteKeyBoardDepth - blackKeyBoardDepth / 2 - bodyDepth / 2 + depthMargin); // ピアノ イベント処理 keyboard_f.setOnTouchPressed(te -> { recordingEvent(recording, eventRecording, actionEventTime, keyboard_f, te); pressedWhiteKeyBoard(f, keyboard_f, whiteKeyBoardDepth); }); keyboard_f.setOnTouchReleased(te -> { recordingEvent(recording, eventRecording, actionEventTime, keyboard_f, te); releasedKeyBoard(keyboard_f); }); keyboard_g.setOnTouchPressed(te -> { recordingEvent(recording, eventRecording, actionEventTime, keyboard_g, te); pressedWhiteKeyBoard(g, keyboard_g, whiteKeyBoardDepth); }); keyboard_g.setOnTouchReleased(te -> { recordingEvent(recording, eventRecording, actionEventTime, keyboard_g, te); releasedKeyBoard(keyboard_g); }); keyboard_a.setOnTouchPressed(te -> { recordingEvent(recording, eventRecording, actionEventTime, keyboard_a, te); pressedWhiteKeyBoard(a, keyboard_a, whiteKeyBoardDepth); }); keyboard_a.setOnTouchReleased(te -> { recordingEvent(recording, eventRecording, actionEventTime, keyboard_a, te); releasedKeyBoard(keyboard_a); }); keyboard_b.setOnTouchPressed(te -> { recordingEvent(recording, eventRecording, actionEventTime, keyboard_b, te); pressedWhiteKeyBoard(b, keyboard_b, whiteKeyBoardDepth); }); keyboard_b.setOnTouchReleased(te -> { recordingEvent(recording, eventRecording, actionEventTime, keyboard_b, te); releasedKeyBoard(keyboard_b); }); keyboard_f_s.setOnTouchPressed(te -> { recordingEvent(recording, eventRecording, actionEventTime, keyboard_f_s, te); pressedBlackKeyBoard(f_s, keyboard_f_s, blackKeyBoardDepth); }); keyboard_f_s.setOnTouchReleased(te -> { recordingEvent(recording, eventRecording, actionEventTime, keyboard_f_s, te); releasedKeyBoard(keyboard_f_s); }); keyboard_g_s.setOnTouchPressed(te -> { recordingEvent(recording, eventRecording, actionEventTime, keyboard_g_s, te); pressedBlackKeyBoard(g_s, keyboard_g_s, blackKeyBoardDepth); }); keyboard_g_s.setOnTouchReleased(te -> { recordingEvent(recording, eventRecording, actionEventTime, keyboard_g_s, te); releasedKeyBoard(keyboard_g_s); }); keyboard_a_s.setOnTouchPressed(te -> { recordingEvent(recording, eventRecording, actionEventTime, keyboard_a_s, te); pressedBlackKeyBoard(g_s, keyboard_a_s, blackKeyBoardDepth); }); keyboard_a_s.setOnTouchReleased(te -> { recordingEvent(recording, eventRecording, actionEventTime, keyboard_a_s, te); releasedKeyBoard(keyboard_a_s); }); pianoGroup.getChildren().addAll(keyboard_f, keyboard_g, keyboard_a, keyboard_b, keyboard_f_s, keyboard_g_s, keyboard_a_s, body, body2); // サブシーン用のカメラ subCam = new PerspectiveCamera(true); // Field of View subCam.setFieldOfView(45.5); // Clipping Planes subCam.setNearClip(1.0); subCam.setFarClip(1_000_000); // サブカメラ操作用 // 移動 subCam.translateXProperty().bind(xPos); subCam.translateYProperty().bind(yPos); subCam.translateZProperty().bind(zPos); // 回転 使ってないけど説明のため Rotate rxRotate; Rotate ryRotate; Rotate rzRotate; subCam.getTransforms().setAll( rxRotate = new Rotate(0, Rotate.X_AXIS), ryRotate = new Rotate(0, Rotate.Y_AXIS), rzRotate = new Rotate(0, Rotate.Z_AXIS) ); rxRotate.angleProperty().bind(rxPos); ryRotate.angleProperty().bind(ryPos); rzRotate.angleProperty().bind(rzPos); // 環境光設定 final AmbientLight ambient = new AmbientLight(); ambient.setColor(Color.rgb(90, 90, 90, 0.6)); ambient.getScope().addAll(pianoGroup); // ポイントライト設定 PointLight point = new PointLight(); point.setColor(Color.rgb(255, 255, 255, 1.0)); point.setLayoutX(0); point.setLayoutY(-300); point.setTranslateZ(-100); point.getScope().addAll(pianoGroup); pianoGroup.getChildren().addAll(ambient, point); SubScene subScene = new SubScene(pianoGroup, 1_920, 1_080, true, SceneAntialiasing.BALANCED); subScene.setFill(Color.ALICEBLUE); subScene.setCamera(subCam); return subScene; } // プレイバック、ファイル保存など private Parent createControlScene() { recordingButton = new Button("Recording"); stopButton = new Button("Stop"); playbackButton = new Button("Playback"); saveButton = new Button("Save"); loadButton = new Button("Load"); stopButton.setDisable(true); playbackButton.setDisable(true); saveButton.setDisable(true); recordingButton.setOnAction(ae -> { recording = true; if (eventRecording != null) { eventRecording = null; } eventRecording = new ArrayList<>(); recordingButton.setDisable(true); stopButton.setDisable(false); playbackButton.setDisable(true); saveButton.setDisable(true); loadButton.setDisable(true); resetKeyboard(); subCamReset(); openAnimation(); recording(); }); stopButton.setOnAction(ae -> { activePlayback = false; stopButton.setDisable(true); recordingButton.setDisable(false); playbackButton.setDisable(false); if (eventRecording != null) { saveButton.setDisable(false); } else { saveButton.setDisable(true); } saveButton.setDisable(false); loadButton.setDisable(false); recordingStop(); }); playbackButton.setOnAction(ae -> { recording = false; activePlayback = true; recordingButton.setDisable(true); stopButton.setDisable(false); playbackButton.setDisable(true); saveButton.setDisable(true); loadButton.setDisable(true); resetKeyboard(); playBackAnimation(); playback(); }); saveButton.setOnAction(ae -> { if (eventRecording != null) { fileChooser.setTitle("Save File"); File outFile = fileChooser.showSaveDialog(null); if (outFile != null) { ObjectOutputStream oos = null; try { oos = new ObjectOutputStream(new FileOutputStream(outFile.getAbsolutePath())); } catch (IOException ex) { Logger.getLogger(ToyPiano.class.getName()).log(Level.SEVERE, null, ex); } try { oos.writeObject(eventRecording); } catch (IOException ex) { Logger.getLogger(ToyPiano.class.getName()).log(Level.SEVERE, null, ex); } } } }); loadButton.setOnAction(ae -> { fileChooser.setTitle("Load File"); File inputFile = fileChooser.showOpenDialog(null); if (inputFile != null) { ObjectInputStream ois = null; try { ois = new ObjectInputStream(new FileInputStream(inputFile.getAbsolutePath())); } catch (FileNotFoundException ex) { Logger.getLogger(ToyPiano.class.getName()).log(Level.SEVERE, null, ex); } catch (IOException ex) { Logger.getLogger(ToyPiano.class.getName()).log(Level.SEVERE, null, ex); } eventRecording = new ArrayList<>(); try { eventRecording = (List<EventRecording>) ois.readObject(); } catch (IOException | ClassNotFoundException ex) { Logger.getLogger(ToyPiano.class.getName()).log(Level.SEVERE, null, ex); // 8u40 だったらエラーダイアログをだせるんだけどなぁ・・・ } recordingButton.setDisable(false); stopButton.setDisable(true); playbackButton.setDisable(false); saveButton.setDisable(true); loadButton.setDisable(false); } }); // オプション操作用 UI // グリッドペイン スペーサー Region region = new Region(); region.setId("spacer"); openCloseButton = new ToggleButton("Close"); openCloseButton.setId("open-close-toggle-button"); // マススがホバー状態、クリックした時にカーソル形状変更 changeCursorStyle(openCloseButton); // グリッドペイン構築 GridPane grid = new GridPane(); int rowIndex = 0; int colIndex = 0; grid.add(recordingButton, colIndex++, rowIndex, 1, 2); grid.add(stopButton, colIndex++, rowIndex, 1, 2); grid.add(playbackButton, colIndex++, rowIndex, 1, 2); grid.add(saveButton, colIndex++, rowIndex, 1, 2); grid.add(loadButton, colIndex++, rowIndex, 1, 2); int totalColumns = colIndex; rowIndex++; rowIndex++; colIndex = 0; grid.add(region, colIndex, rowIndex++); rowIndex++; grid.add(openCloseButton, colIndex, rowIndex, totalColumns, 1); GridPane.setHalignment(openCloseButton, HPos.RIGHT); grid.setId("grid"); // スタイルシート適用 grid.getStylesheets().add("jp/yucchi/toypiano/ControlScene.css"); // トグルスイッチがオンの場合トグルスイッチの raw 以外隠し、テキスト変更 openCloseButton.setOnAction(ae -> { if (openCloseButton.isSelected()) { grid.setLayoutY(-grid.sceneToLocal(openCloseButton.localToScene(0, 0)).getY()); openCloseButton.setText("Open"); } else { grid.setLayoutY(0.0d); openCloseButton.setText("Close"); } }); return grid; } private void openAnimation() { Timeline openAnimation = new Timeline( new KeyFrame( new Duration(0.0d), new KeyValue(angleX, 0.0d, Interpolator.EASE_BOTH), new KeyValue(angleY, 0.0d, Interpolator.EASE_BOTH) ), new KeyFrame( new Duration(1_000.0d), new KeyValue(angleX, 45, Interpolator.EASE_BOTH), new KeyValue(angleY, 360, Interpolator.EASE_BOTH) )); openAnimation.setCycleCount(1); openAnimation.play(); } private void playBackAnimation() { Timeline playBackAnimation = new Timeline( new KeyFrame( new Duration(0.0d), new KeyValue(angleX, 0.0d, Interpolator.EASE_BOTH), new KeyValue(angleY, 0.0d, Interpolator.EASE_BOTH), new KeyValue(angleZ, 0.0d, Interpolator.EASE_BOTH) ), new KeyFrame( new Duration(1_000.0d), new KeyValue(angleX, 0.0d, Interpolator.EASE_BOTH), new KeyValue(angleY, 360.0d, Interpolator.EASE_BOTH), new KeyValue(angleZ, 0.0d, Interpolator.EASE_BOTH) )); playBackAnimation.setCycleCount(1); playBackAnimation.play(); } private void recording() { recordingAnimation = new AnimationTimer() { long recordingStartTime; private boolean rec; @Override public void handle(long now) { if (!rec) { recordingStartTime = now; rec = true; } // 時間(actionEventTime)の初期化 actionEventTime = now - recordingStartTime; } }; recordingAnimation.start(); } private void recordingStop() { if (recording) { recordingLastTime = actionEventTime; // レコーディング中であればレコーディングストップを記録 eventRecording.add(new EventRecording(recordingLastTime, "FINISH", "FINISH")); recordingAnimation.stop(); recordingAnimation = null; recording = false; } else { playbackAnimation.stop(); } resetKeyboard(); } private void playback() { playbackAnimation = new AnimationTimer() { int i = 0; boolean playback; long playbackStartTime; private long playbackTime; // カメラ用アニメーション // 方位角 private double azimuth; // 前回時間 private long previousHandledTime; // 回転速度 private final DoubleProperty angularVelocityProperty = new SimpleDoubleProperty(5.0d); // カメラ高さ private final DoubleProperty heightProperty = new SimpleDoubleProperty(-250.0d); // 半径 private final double radius = 750.0d; // 見下ろし角度 private final double downAngle = Math.toDegrees(Math.atan(-1.0d * heightProperty.getValue() / radius)); @Override public void handle(long now) { if (!playback) { playbackStartTime = now; playback = true; } // 時間(playbackTime)の初期化 playbackTime = now - playbackStartTime; // eventRecording のデータに基づきプレイバックさせる if (eventRecording.size() > i && eventRecording.get(i).getEventTime() <= playbackTime) { doEvent(eventRecording.get(i).getEventProducer(), eventRecording.get(i).getEventType()); i++; } // サブカメラを半径 SUBCAMERA_RADIUS の円の中心むけ、中心に見下ろすように撮影する // 回転スピードも前側と後ろ側で変える if ((0.0d <= azimuth && azimuth < 90.0d || 270.0d < azimuth) && (0.0d < (azimuth % 360.0d) && (azimuth % 360.0d) < 90.0d) || 270.0d < (azimuth % 360.0d)) { azimuth += angularVelocityProperty.get() * (playbackTime - previousHandledTime) / 1_000_000_000.0d; previousHandledTime = playbackTime; } else { azimuth += angularVelocityProperty.get() * 35.0d * (playbackTime - previousHandledTime) / 1_000_000_000.0d; previousHandledTime = playbackTime; } // カメラ移動及び回転 xPos.set(Math.sin(Math.toRadians(azimuth)) * radius); zPos.set(-1.0d * Math.cos(Math.toRadians(azimuth)) * radius); yPos.set(heightProperty.getValue()); subCam.getTransforms().setAll(new Rotate(-1.0d * azimuth, Rotate.Y_AXIS), new Rotate(-1.0d * downAngle, Rotate.X_AXIS)); // プレイバック終了処理 if (eventRecording.get(eventRecording.size() - 1).getEventTime() < playbackTime) { stopButton.setDisable(true); recordingButton.setDisable(false); playbackButton.setDisable(false); saveButton.setDisable(false); loadButton.setDisable(false); activePlayback = false; recordingStop(); } } private void doEvent(String eventProducer, String eventType) { if (eventProducer != null && eventType != null) { switch (eventProducer) { case "F": if (eventType.equals("TOUCH_PRESSED")) { pressedWhiteKeyBoard(f, keyboard_f, whiteKeyBoardDepth); } else { releasedKeyBoard(keyboard_f); } break; case "G": if (eventType.equals("TOUCH_PRESSED")) { pressedWhiteKeyBoard(g, keyboard_g, whiteKeyBoardDepth); } else { releasedKeyBoard(keyboard_g); } break; case "A": if (eventType.equals("TOUCH_PRESSED")) { pressedWhiteKeyBoard(a, keyboard_a, whiteKeyBoardDepth); } else { releasedKeyBoard(keyboard_a); } break; case "B": if (eventType.equals("TOUCH_PRESSED")) { pressedWhiteKeyBoard(b, keyboard_b, whiteKeyBoardDepth); } else { releasedKeyBoard(keyboard_b); } break; case "F_S": if (eventType.equals("TOUCH_PRESSED")) { pressedBlackKeyBoard(f_s, keyboard_f_s, blackKeyBoardDepth); } else { releasedKeyBoard(keyboard_f_s); } break; case "G_S": if (eventType.equals("TOUCH_PRESSED")) { pressedBlackKeyBoard(g_s, keyboard_g_s, blackKeyBoardDepth); } else { releasedKeyBoard(keyboard_g_s); } break; case "A_S": if (eventType.equals("TOUCH_PRESSED")) { pressedBlackKeyBoard(a_s, keyboard_a_s, blackKeyBoardDepth); } else { releasedKeyBoard(keyboard_a_s); } break; case "FINISH": break; default: dameyo.play(); System.out.println("(>_<。)"); } } } }; playbackAnimation.start(); } private void changeCursorStyle(Node node) { node.setOnMouseEntered(mouseEvent -> { node.cursorProperty().setValue(Cursor.OPEN_HAND); }); node.setOnMousePressed(mouseEvent -> { node.cursorProperty().setValue(Cursor.CLOSED_HAND); }); node.setOnMouseExited(mouseEvent -> { node.cursorProperty().setValue(Cursor.DEFAULT); }); } private void resetKeyboard() { releasedKeyBoard(keyboard_f); releasedKeyBoard(keyboard_g); releasedKeyBoard(keyboard_a); releasedKeyBoard(keyboard_b); releasedKeyBoard(keyboard_f_s); releasedKeyBoard(keyboard_g_s); releasedKeyBoard(keyboard_a_s); } private void subCamReset() { subCam.getTransforms().setAll(new Rotate(0.0d, 0.0d, 0.0d)); xPos.set(0.0d); yPos.set(0.0d); zPos.set(-600.0d); } @Override public void pressedWhiteKeyBoard(AudioClip ac, Box keyBoard, double keyBoardDepth) { ac.play(); keyBoard.getTransforms().setAll(new Rotate(WHITE_KEYBOARD_DOWN_ANGLE, 0.0d, 0.0d, keyBoardDepth / 2, Rotate.X_AXIS)); } @Override public void pressedBlackKeyBoard(AudioClip ac, Box keyBoard, double keyBoardDepth) { ac.play(); keyBoard.getTransforms().setAll(new Rotate(BLACK_KEYBOARD_DOWN_ANGLE, 0.0d, 0.0d, keyBoardDepth / 2, Rotate.X_AXIS)); } @Override public void releasedKeyBoard(Box keyBoard) { keyBoard.getTransforms().setAll(new Rotate(0.0d, 0.0d, 0.0d)); } @Override public void recordingEvent(boolean recording, List<EventRecording> eventRecording, long actionEventTime, Box keyboard, TouchEvent te) { if (recording) { eventRecording.add(new EventRecording(actionEventTime, keyboard.getUserData().toString(), te.getEventType().toString())); } } } |
|
1 2 3 4 5 6 7 8 9 10 11 12 13 14 15 16 17 18 19 20 21 22 23 24 25 26 27 28 29 30 31 32 33 34 35 36 37 38 39 40 41 42 43 44 45 46 47 48 49 50 51 52 53 54 55 |
/* Created on : 2014/12/10, 23:58:18 Author : Yucchi */ #grid { -fx-hgap: 5px; -fx-vgap: 1px; -fx-alignment: center; -fx-background-color: TRANSPARENT; -fx-padding: 7px 7px 7px 7px; -fx-opacity: 0.9; } #spacer { -fx-min-height: 1px; } #open-close-toggle-button { -fx-background-color: TRANSPARENT; -fx-text-fill: hotpink; -fx-font-size: 10pt; -fx-font-weight: bold; } #open-close-toggle-button:hover { -fx-background-color: TRANSPARENT; -fx-text-fill: red; } #open-close-toggle-button:pressed{ -fx-background-color: TRANSPARENT; -fx-text-fill: lightgreen; } /* Button */ .button { -fx-background-color: hotpink; -fx-background-radius: 30; -fx-background-insets: 0; -fx-font-size: 10pt; -fx-font-weight: bold; -fx-text-fill: White; } .button:hover { -fx-background-color: deeppink ; -fx-text-fill: yellow ; -fx-effect: dropshadow( three-pass-box , rgba(0,0,0,0.6) , 5, 0.0 , 0 , 1 ); } .button:pressed { -fx-background-color: aliceblue; -fx-text-fill: deeppink; } |
最後まで読んでくださってありがとうございます。
感謝をこめて注意が必要なことを書いておきます。
タッチインタフェースを使っているので次の例外が投げられるかもしれません。
Exception in thread “JavaFX Application Thread” java.lang.RuntimeException: Too many touch points reported
これが投げられても動いていればいいのですがタッチが効かなくなる場合があります。(マウスは動きます)
Twitter でつぶやいたら @aoetk さんから次のようなアドバイスをいただきました。
「処理を非同期にするのも一つの手ですね。タッチだとこの辺がどうしてもシビアになりますねえ。
Windows Storeアプリ開発に使うWinRT APIでは、50ミリ秒以上掛かる処理は非同期にせよといわれているようです。」
ありがとうございました。(^_^)
早速イベント処理を下記のように非同期に変更してみました。
keyboard_f.setOnTouchPressed(te -> {
Task<Void> task = new Task<Void>() {
@Override
protected Void call() throws Exception {
recordingEvent(recording, eventRecording, actionEventTime, keyboard_f, te);
Platform.runLater(() -> {
pressedWhiteKeyBoard(f, keyboard_f, whiteKeyBoardDepth);
});
return null;
}
};
executor_1.execute(task);
});
残念ながら改善されませんでした。
何が悪いのか解らずどうしようって悩んでいたのですが今年の9月の末に購入した VAIO ノートで動かしたら全然問題なしでした。
プログラムを組んでいた PC だけなのでひょっとしたらハードの問題かもしれません。
タッチパネルの性能?
タッチパネルのドライバとか?
何はともあれ新しい方の PC で問題ないから良しとしましょう。(ヲヒ
もう一つ、タッチインタフェースを使っているのでピアノを演奏しているときにタッチドラッグが発生して不用意に動いてしまうことがあります。
これを防止するために苦肉の策として次のようなことをしました。
これが正しいかどうかは解りませんが何らかの処理が必要となります。
// プレイバック以外のタッチドラッグを禁止させるために
subScene.setOnTouchPressed(te -> {
touchPressedCount++; // フィールドへアクセス 取扱注意
});
subScene.setOnTouchReleased(te -> {
touchReleasedCount++; // フィールドへアクセス 取扱注意
});
// 略
subScene.setOnMouseDragged(event -> {
if (touchPressedCount == touchReleasedCount || activePlayback) {
angleX.set(anchorAngleX – (anchorY – event.getSceneY()));
angleY.set(anchorAngleY + anchorX – event.getSceneX());
}
});
3D 同様タッチインタフェースを使った解説が少ないのでこういったときの定番処理というのが良く解りません。
先日もマウススクロールによるカメラポジションの変更で随分悩みました。
JavaFXでマウスホイールを使ってのズームインズームアウトは可能か?
タッチインタフェースの完全無欠の使い方を知りたい今日この頃です。
あと、カメラの移動、回転なんですがこのプログラムでは、見下ろし角度(X 軸)と中心への角度(Y 軸)でカメラを回転させています。
// カメラ移動及び回転
xPos.set(Math.sin(Math.toRadians(azimuth)) * radius);
zPos.set(-1.0d * Math.cos(Math.toRadians(azimuth)) * radius);
yPos.set(heightProperty.getValue());
subCam.getTransforms().setAll(new Rotate(-1.0d * azimuth, Rotate.Y_AXIS), new Rotate(-1.0d * downAngle, Rotate.X_AXIS));
このコードの最後の行でカメラを回転させています。
ここで最後の行を次のようなコードを書くとはまります。
ryPos.set(-1.0d * azimuth);
rxPos.set(-1.0d * downAngle);
理屈的には同じように感じるのですがまったく違います。
残念ながらとんでもないカメラワークとなってしまいます。
見下ろし角をつけずに Y 軸だけ回転させるのであれば次のコードで問題ありません。
// カメラ移動及び回転
xPos.set(Math.sin(Math.toRadians(azimuth)) * radius);
zPos.set(-1.0d * Math.cos(Math.toRadians(azimuth)) * radius);
yPos.set(heightProperty.getValue());
ryPos.set(-1.0d * azimuth);
回転させるコードを書くときは注意が必要です。
あとはいたってシンプルなものなので作って遊んでみるのもいいかもしれません。
実際に Box オブジェクトだけを使い移動と回転だけしかさせていません。
OneDrive にこのプログラムを置いてありますので遊んでみたい方は次のリンクからどうぞ。
一応、何かトラブルが起こって損害が発生しても責任は一切負えませんので(^_^;)
/**
*
* @おまけのお知らせ
*
* SwingNodeとTextFlow
*
* JavaFX で英語力を補う
*
*/
最後にひと言
JavaFX 楽しい!
TAGS: JavaFX | 2014年12月11日1:41 AM | Comment : 1

